You are here
How to Make a Hexie Holiday Ornament (with a little English Paper Piecing)
I loves me some English Paper Piecing, so I couldn't resist the lure of this ornament. Technically speaking, it's not quite EPP, because we're going to leave all the papers in – and the basting. That's what gives this ornament its structure.
Is this a super quick kind of project? Well, not exactly - it's EPP. Think of this as a fun little diversion to keep on hand for when you're watching Christmas movies. It's a cozy kind of process that might take you several sessions to finish, but isn't the journey the best part?
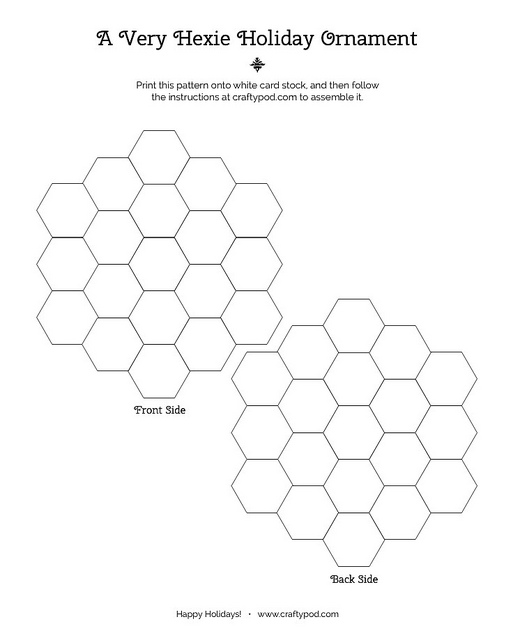
Anyway. I made you a pattern for the little hexie templates - just click here to download. You'll also need:
- Sheet of card stock, preferably white
- Fabric scraps
- Paper scissors and fabric scissors
- Sewing needle (something fairly thin, like a sharp or quilting needle)
- Thread that coordinates with your fabrics
- Glue stick (the fabric kind, or the regular kind)
- Scrap of chipboard (a box from your recycle bin is fine)
- A bit of floss for a hanger

First, you'll need to print that pattern onto card stock, and then carefully cut all the hexies out. These babies are on the small side - just 1/2 inch per side. But they're easy to handle with the basting method we'll be using.
(If you'd rather not do the work of cutting, you can order premade hexies from the wonderful Paper Pieces website.)
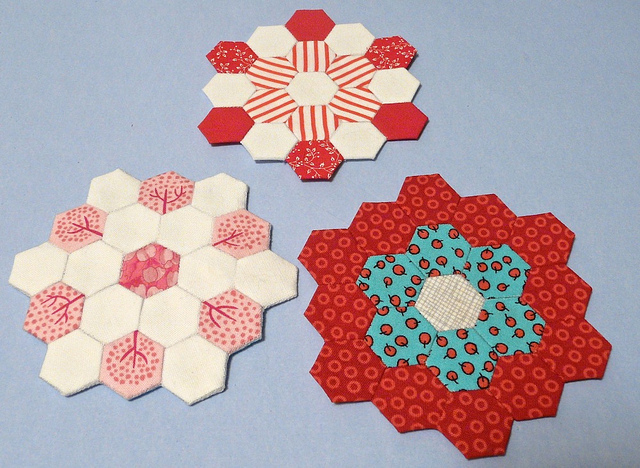
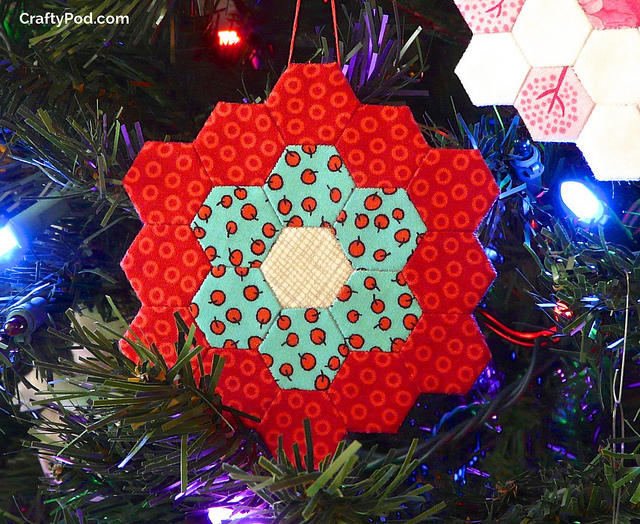
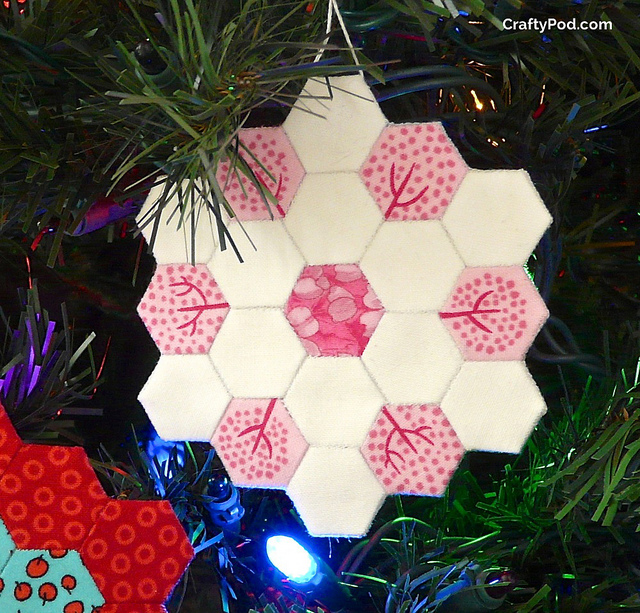
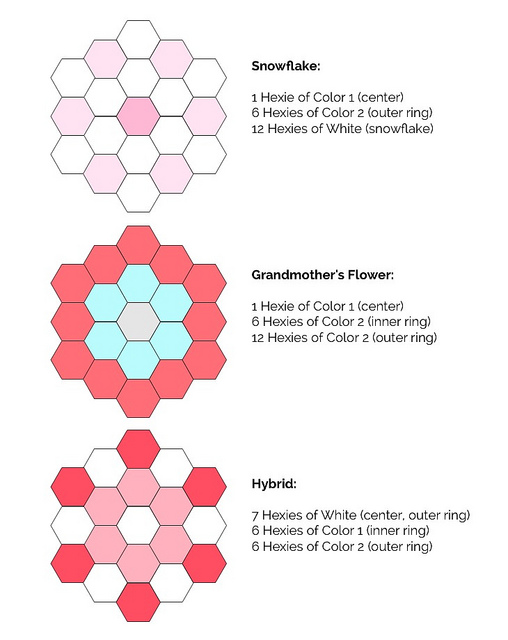
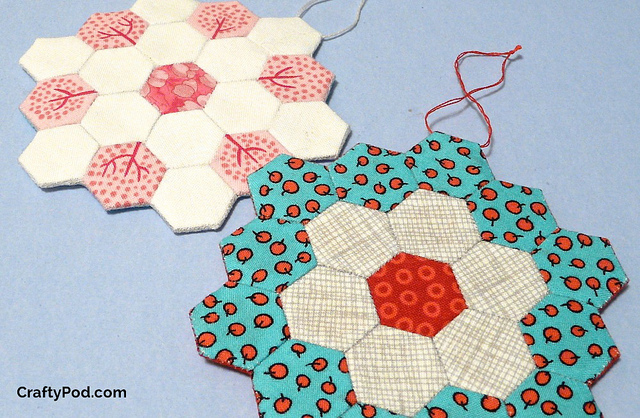
Then it's time to decide what kind of design you'll use for your ornament. Here are three nice possibilities - a traditional Grandmother's Flower Garden flower, a snowflake, and a hybrid of the two. Below are the hexie counts you'll need to make each one…
…Or, feel free to play around and come up with something different!
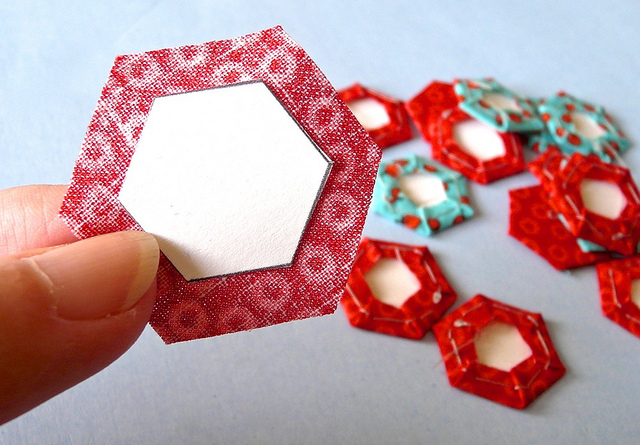
To cover a template in fabric, lightly glue-stick it to the wrong side of the fabric. Cut the fabric around the template, about 1/4" larger on all sides. Then, we'll baste the edges of the fabric around the paper.
Actually, Haley has a fantastic tutorial on the basting method I like best for this project, so instead of reinventing the wheel, I'll point you over to her how-to. I'll wait here while you check it out.
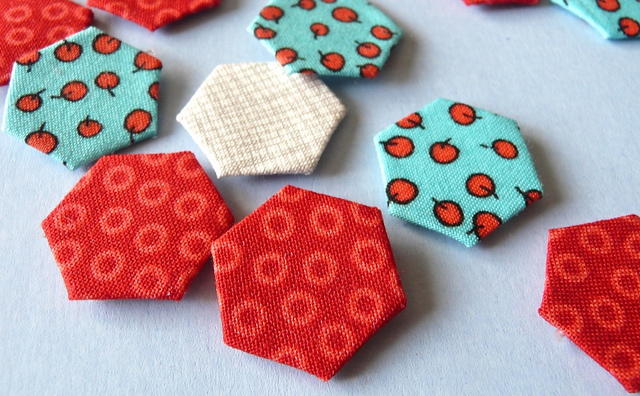
There are actually more ways to baste EPP than this, so if you have a favorite way that doesn't sew through the papers, please feel free to use it. You just need to end up with hexie patches that look like these on their front sides.
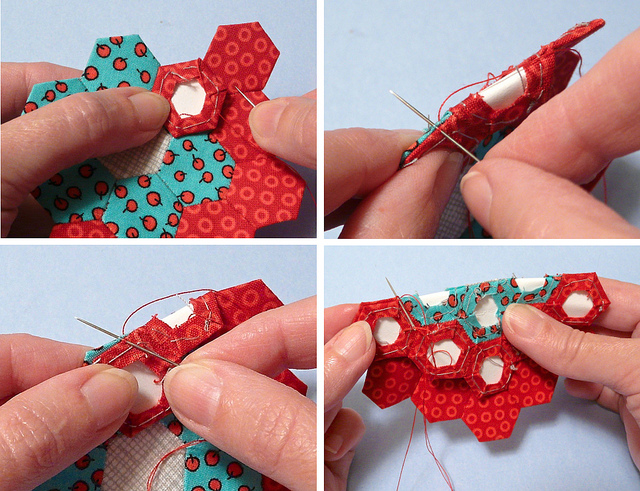
Next, it's time to sew all these little hexies together. We do this with a whip stitch. Wendi has a great how-to for the stitch, and Haley has a great how-to about joining hexies. So again, I won't re-invent the wheel. Check these links out, and you'll have all the info you need to sew your hexies together.
(Also, you might mention to these ladies how awesome they are when you're over there.)
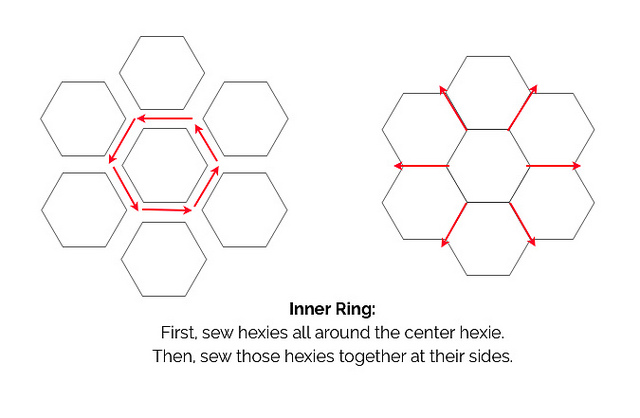
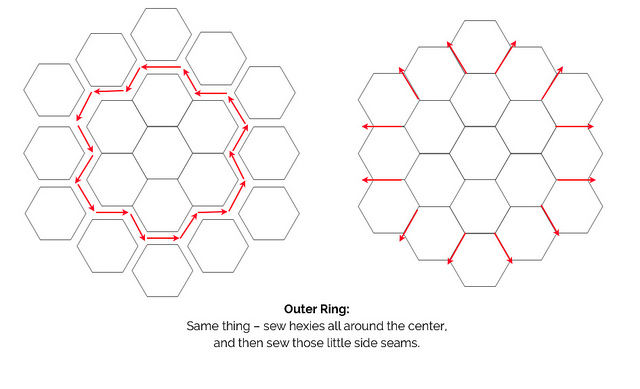
In case it's helpful, here's how I usually tackle the sewing-together. But EPP is very forgiving stuff, so you don't have to sew your hexies together in this order at all. Feel free to stitch in any mode that's comfortable for you.
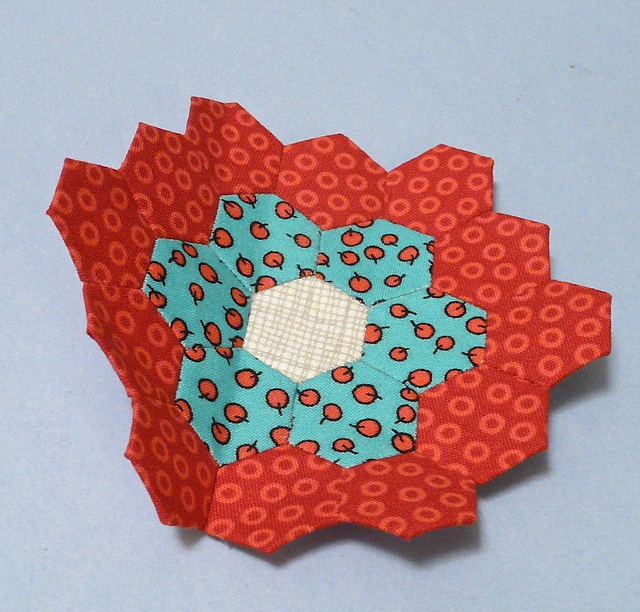
In the process of sewing your hexies, you'll be bending and folding your work every which way, and this means that your finished piece will be a little, um, beat-up looking. Not to worry! Give it a good pressing with a hot iron and steam. Press the iron firmly down onto the piece, and be sure to let it cool completely before you pick it up.
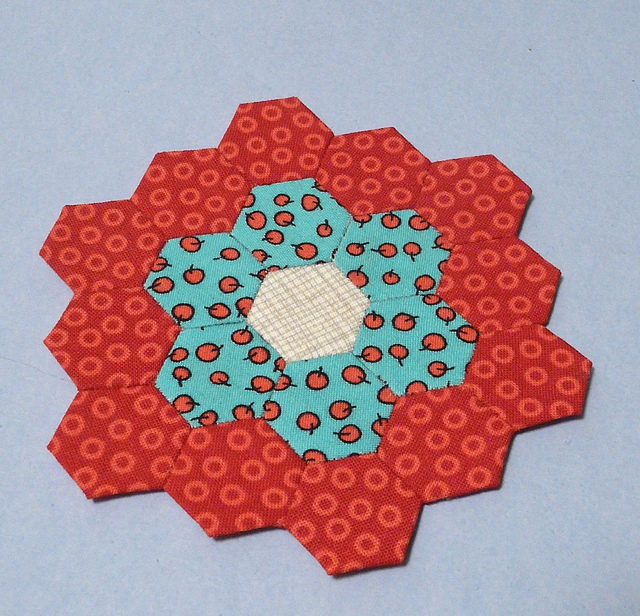
See? Good as new! So, make two pieces like this – one for the front of your ornament, and one for the back. They can be identical or different - your choice. (A lot of the time, I make them the same pattern, but using different colors or different color placement.)
OK, so now you have two crisp, pressed ornament halves. We need to add just a little more stiffening.
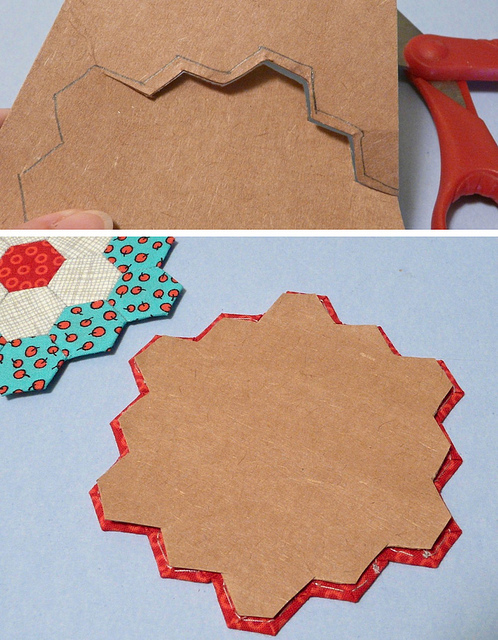
Trace one of your ornament halves onto some chipboard with a pencil. Cut it out about 1/8" inside your traced lines. You want to end up with the chipboard being smaller on all sides than the ornament. See?
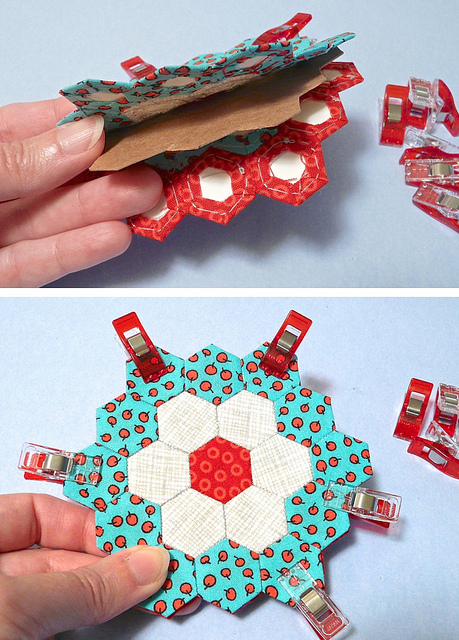
Now, sandwich the chipboard piece between the two ornament halves. Make sure the right sides of the ornaments are facing outward. And hold the whole thing together with some binder clips or Wonder Clips.
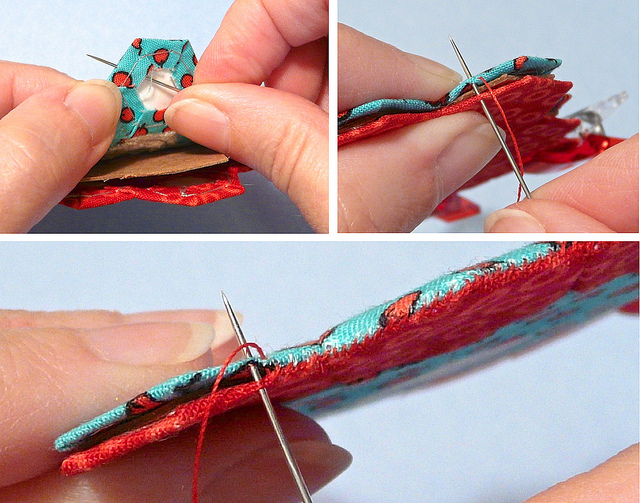
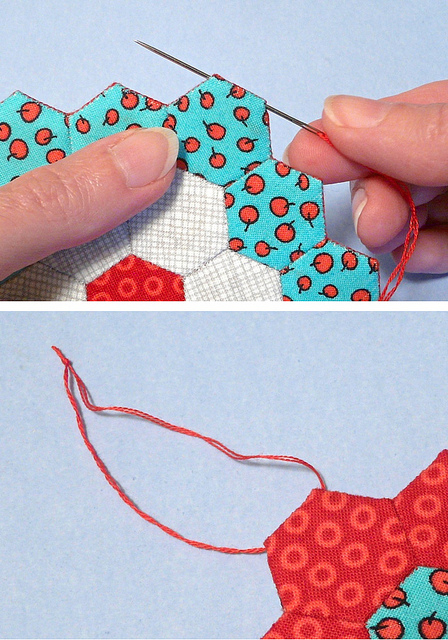
Use a whip stitch again to sew around the outer edge. This stitching will be visible, so use a little care here. Try to find a thread color that blends with all the fabrics that appear at the outer edges. If you're stumped, some shade of grey will usually do the trick.
The top two photos above show you a neat way to hide the knot in your thread. When you begin sewing, bring your needle out through the seam allowance of one patch. Then put the layers back together and begin whip stitching.
...And here's my best Pro Tip for this edge-sewing: it shouldn't be hard. There's no need to force your needle through any cardboard here. Take each stitch through the edges of the fabric only. If you're trying to put your needle through and feeling resistance, then you're hitting cardboard somewhere. Feel around for a new spot where there's no resistance on your needle at all - that's pure fabric!
To make a hanging loop, take about a 7" length of six-strand embroidery floss. Separate out two strands and thread them on a long sewing needle. Poke this needle carefully between the layers at the top of the ornament, as shown here. Then pull the thread through and tie the ends in a tight double knot, making the loop any size you like. Cut the ends of the floss close to the knot. (I like to put a tiny bit of glue on the knot to seal it.)
Give this baby one more good pressing, and it's ready to go! Happy Piecing, and Happy Holidays!


![[Valid RSS]](../../../sites/files_cp7/valid-rss.png "Validate my RSS feed")