You are here
How to Make a Plastic Canvas Gem Ornament
This tutorial is basically an act of sheer determination. As some of you know, I started a part-time job recently, and while that's a very good thing, it's also been quite an adjustment – particularly when it comes to creating blog content. I'm working from my home studio only three days a week, and this being Portland, the sun keeps ignoring my requests to shine on these days so I can take blog photos. (Such a jerk sometimes, that sun.)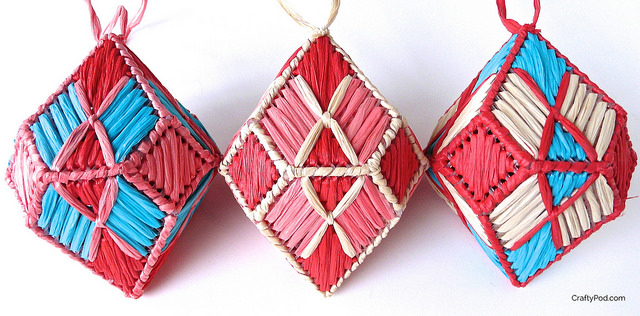
Anyway. A couple months ago, I was noodling with some plastic canvas triangles I found on clearance at my local Jo-Ann, and discovered this ornament form. Then I spent a full month trying to get a tutorial photographed, but kept missing my light opportunities. Finally this morning, I was all "This thing is getting shot TODAY, and I don't much care what the light looks like." So, making use of some wan and paltry window light and a ridiculous amount of photo editing, I got 'er done. And thank goodness!
I'd call this an intermediate sort of PC project. The stitching's very easy, but the assembly may need a little patience. And maybe a beer. But definitely not two!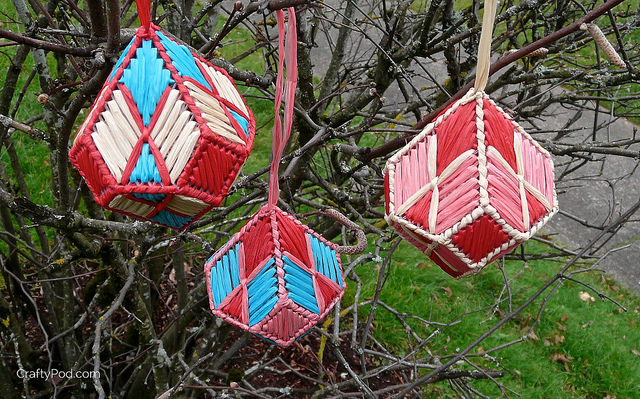
You'll Need:
- • 8 Plastic canvas triangles (available online if your big-box store doesn't have 'em)
- • Scrap of 7 count regular plastic canvas
- • Synthetic raffia or worsted weight yarn, 3 colors
- • Needlepoint needle
- • Scissors
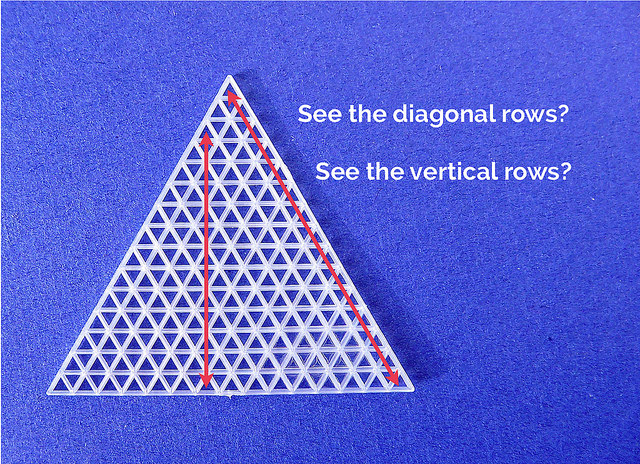
OK, so let's have a little discussion about supplies first. These PC triangles have, as it turns out, triangular holes. That may make stitching on them seem daunting, but don't worry. As you can see, those triangular holes line up nicely in both diagonal and vertical rows, and that's what we'll be using to line up our stitching.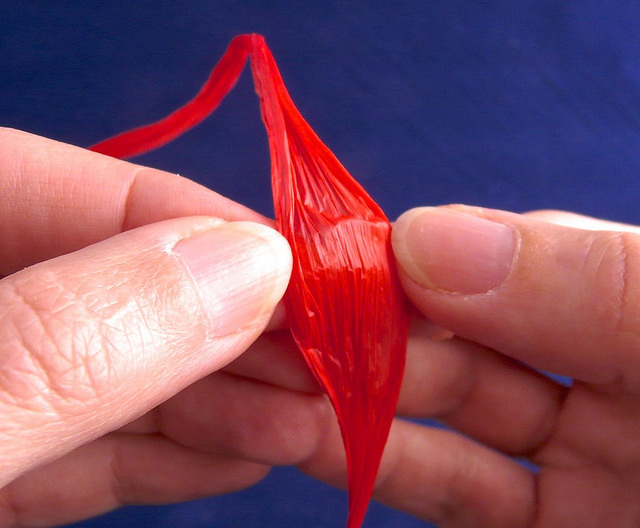
I opted to stitch my ornaments with synthetic raffia, which adds a nice matte finish and straw-like look. But I should say, this stuff is a little more high-maintenance than yarn. You'll want to carefully spread out each strand of raffia before stitching with it, so that you can get maximum coverage over those larger triangular holes. You might want to skip all that and use yarn instead. Play around with your yarn and see if one strand or two gives you the coverage you want.
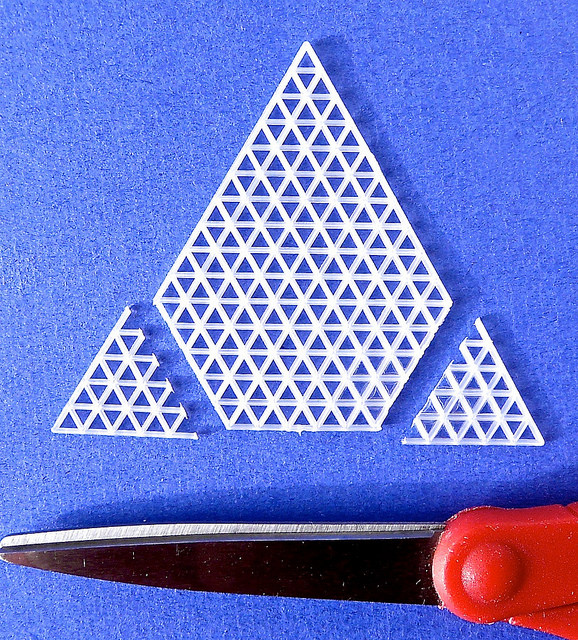
OK, with that said, let's make an ornament. The first step is to trim the bottom corners from your eight PC triangles, as shown here. Use the bottom row of holes as your guide. Count in five holes from each corner and make your cuts.
Then, just use the first piece you cut as a guide for all the rest.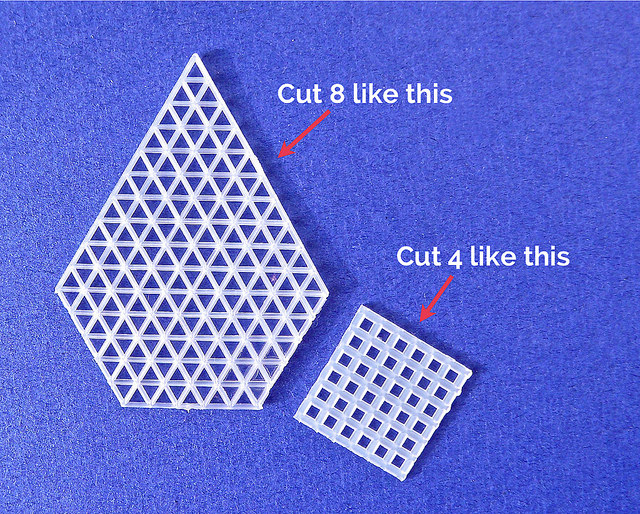
You'll also need four little squares cut from some 7-count PC. Measure against the cut edge of the triangle as shown here. Or cut your squares to 6 holes by 6 holes.
There's no real need for a formal stitch pattern here - we're just following the canvas. So thread up your first color and start at the bottom right corner. Bring your needle up, and then pass it back down at the next corner up, forming a long diagonal stitch that follows the diagonal row of the canvas.
Then make four more stitches like that, following the edge of the canvas along the top and keeping them all the same length.
When you have five stitches, come across to the left side of the canvas and make five diagonal stitches in the opposite directon. The first one should share the same bottom hole as the top stitch of the previous row, as you can see above. Then follow with four more stitches below that and fasten off your raffia.
(Do you need some basics on stitching plastic canvas? Try this video of mine: How to Start and End a Strand of Yarn. Raffia works exactly the same way.)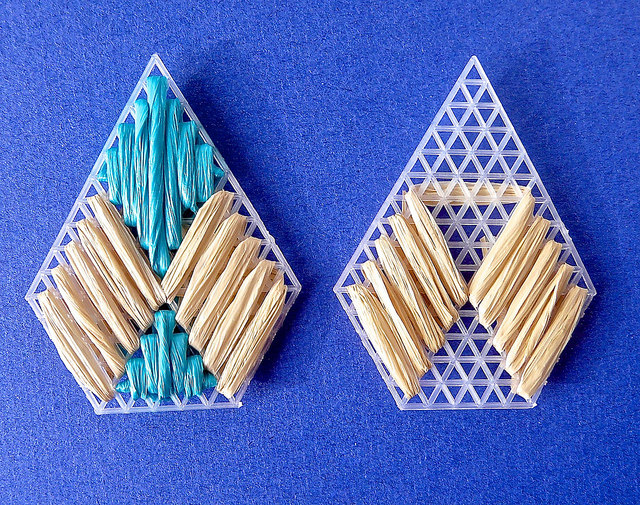
Next, take your second color and make vertical stitches to fill in the rest of the canvas. I find it easiest to start with the longest center stitch, and then make stitches on either side of that.
(If you look closely, you'll see that I missed a hole in my canvas here. So, you know, don't be like me.)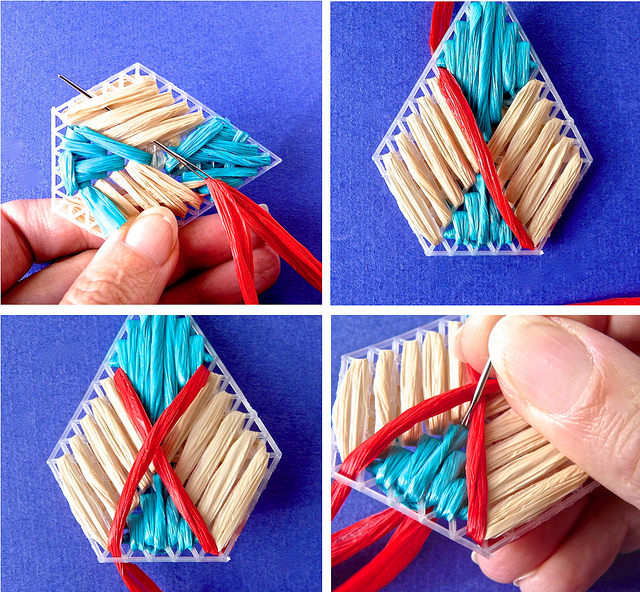
Then, with your third color, stitch a great big "X" across the piece, following the edges of the design. Run your needle under some stitches at the back of your work to secure the end of the raffia, and then use the same holes on both sides to make your "X".
You'll then make a little straight stitch to secure the point where these big stitches overlap. In the fourth photo above, you can see where I'm bringing up my needle, right at the tip of my blue triangle. That's also where I'll put my needle back down to finish the stitch.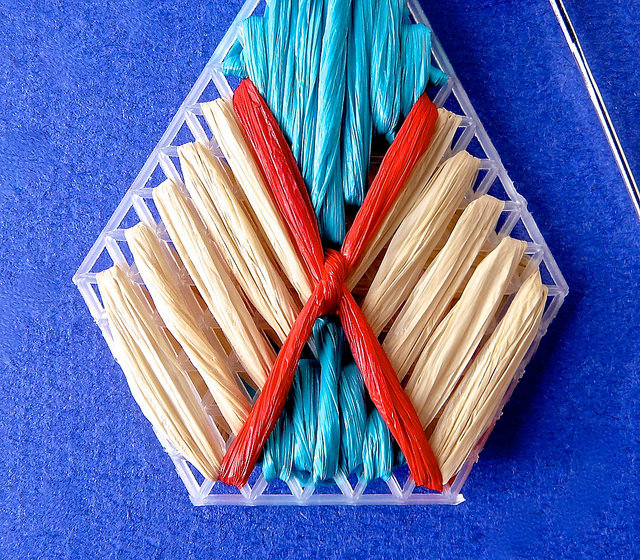
That's what the stitch looks like - see how it tacks down the big "X"?
Go ahead and stitch up all eight pieces in this manner.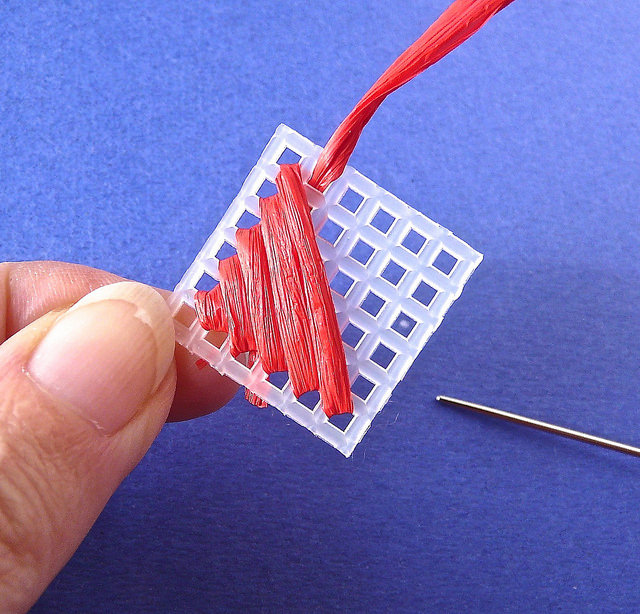
You'll also need to stitch your four squares, using either Color #2 or Color #3. These are super easy - just vertical stitches from corner to corner. Again, do the center one first and then fill in on either side.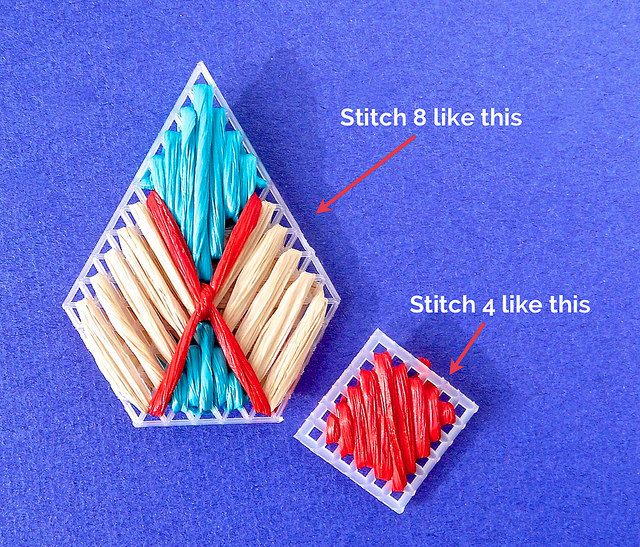
Right – so, just so we're on the same page, here's what you need to have stitched up. Then we'll move on to assembly.
(If you haven't done any PC assambly before, I recommend watching this video, Joining Two Pieces Together.)
Stitch all the pieces together using Color #3. Place two of the "gem" pieces together with wrong sides facing, and sew a seam between their longest edges. Start at the corner where Color #1 is stitched, and sew your way to the tip.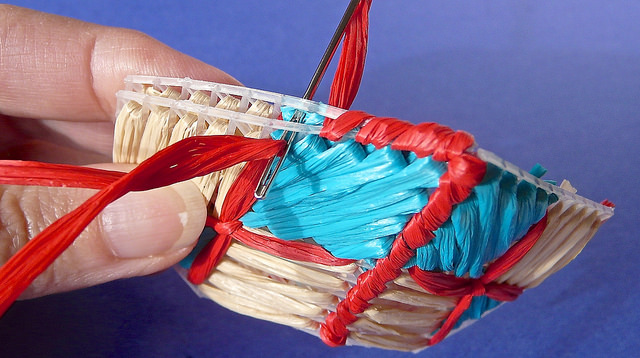
…Then, open up the two pieces you've just sewn together. Add a third one, again placing it wrong sides together. Continue your seam on down toward Color #1 again. When you get to that end, fasten off the raffia.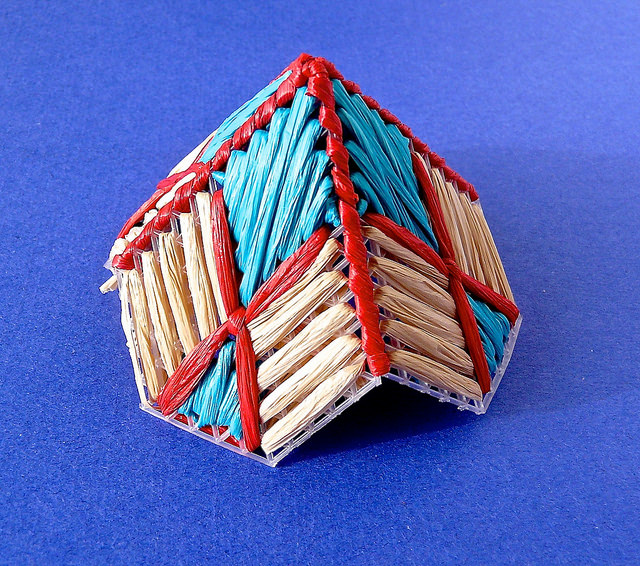
…And then sew the fourth piece on in the same manner. You'll end up with a pyramid shape. Make two sections like this.
A Little Cautionary Note: This is a good moment to mention that these PC triangles are a fair amount more delicate than their square-holed cousins. If you pull your raffia too hard here along the edges of your canvas, it's easy to break it. So, remind yourself to tug the raffia through these edge-holes gently, and pull the stitches snug, but not too tight. This is especially important when you're stitching at the tips of the gem pieces.

Now, take one of those pyramids and stitch the four little squares to it, nesting them into the openings at the corners.
It's easiest to start by placing a square as you see in the top photo above – inside the pyramid, wrong sides facing. Then sew the seam, and then open out the little square. From there, you can line up the next two edges an sew them.
As you do these little seams, the triangle holes and the square holes should pretty much match up. Don't worry too much about that - stitch wherever you can get your needle through both edges, and all shall be well.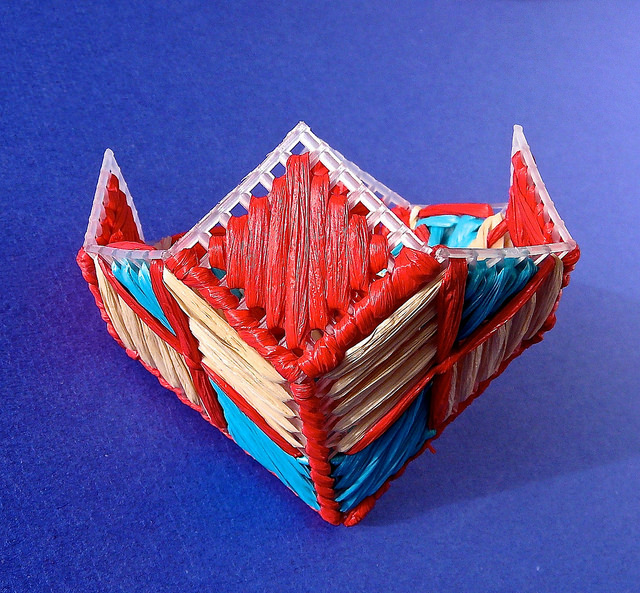
Sew on all four of the little squares. You'll be surprised how much sturdiness this adds to your ornament-in-progress.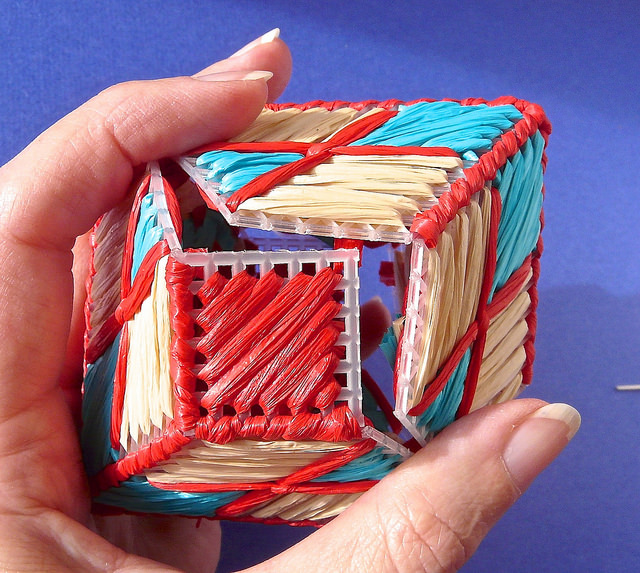
…And now, see how the two pieces of your ornament will nest together? We're going to sew a meandering seam all around the middle to join the two pieces.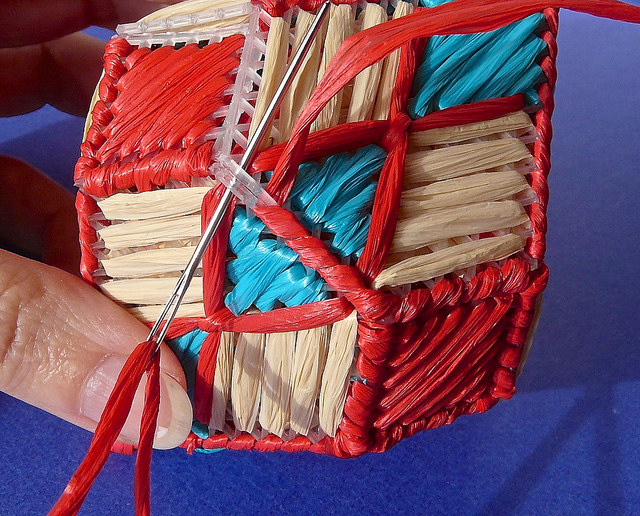
If you haven't done any PC construction before, you might want to watch this video on How to Construct a Lidded Box. Many of the techniques in that video will help you out here.
Some Tips For This Step:
• I recommend starting with about a 30" strand of raffia, so you don't have to stop in the middle and reload your needle. That said, this is a seam that will tend to wear out your raffia as you go, so be prepared for some minor shredding along the way. It won't hurt anything as long as you're still getting coverage.
• Take your time and don't worry too much about the canvas-holes lining up. In some spots, they will, and in others, not so much. Again, just place your stitches wherever you can get your needle through both edges of the canvas.
• The whole thing will feel a bit fiddly until you get the first few segments of that seam done, and then the shape will start to solidify and become much easier to handle.
• And lastly, you'll need to repeatedly pause and un-twist your raffia, so you can get good coverage throughout the seam. Once it twists up, you'll see too much canvas between your stitches.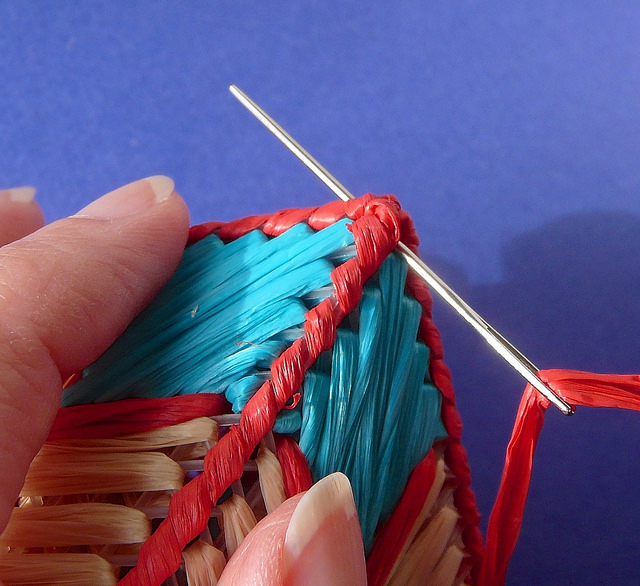
To add a hanger, just thread a piece of raffia through the very tip of the finished ornament. Cut it to the length you want, and tie the ends in a tight double-knot.
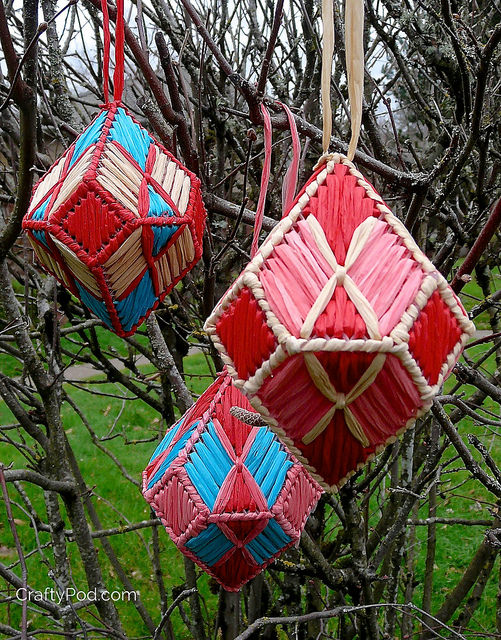
And that's that! I really love how different color combinations change the look of this ornament, and I love how substantial-yet-lightweight they are.
I hope you have a blast making one. And, on the better-than-average chance that this is my last blog post before Christmas, let me also wish you and yours a peaceful holiday!

![[Valid RSS]](../../../sites/files_cp7/valid-rss.png "Validate my RSS feed")
Comments
Wow! Love them, Diane!!!
Hi Diane, awesome are they, and like and love it. Thank you for the sharing.
Did you know you're fuetered on crafting Daily. Congratetulations!!!!!(http://makezine.com/craft/how-to-plastic-canvas-gem-ornaments/?utm_sourc...
You're mom will be proud i think of you.;-D
When i saw the text i thought this will be from you.
well doen girl:_D
Thank you so much, Jet! I was so excited to see my project on CRAFT Daily. It was a last-minute brainstorm, and I'm glad it happened. :-) Happy Holidays to you!
Congratulations for tutorial you're sharing with all the world, the great photos and the detailed description! Bye from Italy