You are here
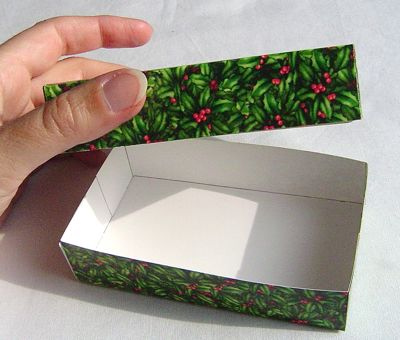
How to make a gift box from an old greeting card!
I was teaching a card-making class over the weekend, and the nicest woman ever said to me, "Have you tried making boxes from your old cards?"
Well, I hadn't, so she showed me the coolest method for converting an old greeting card into a spanking little gift box. And not only that, at the next day's class, she brought me a pile of blank greeting cards, so I could show this to the next Church of Craft meeting. Unbelievably kind! Thank you so much, Deanna.
So, this technique is so exciting, I had to share. You may not be ready to look at Christmas stuff yet, so just imagine a Halloween card in its place if you need to.

Start with a greeting card. If there's writing on the inside, you can glue-stick some paper over it to cover it up.
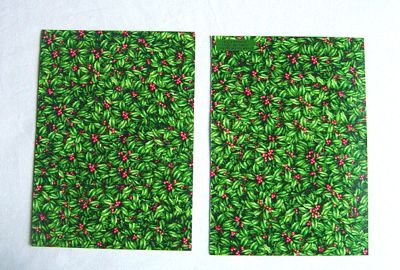
Cut the card in half along the fold.
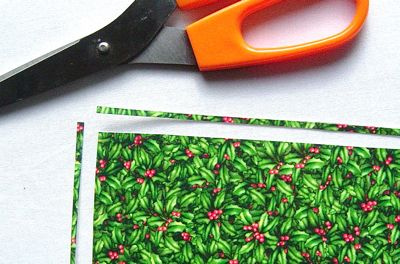
Take one half of the card. Trim about 1/8" off of one long side, and one short side. (If you have a paper cutter, of course, use that.) You do this so that the bottom of your box will be slightly smaller than the top, and they'll fit nicely together.
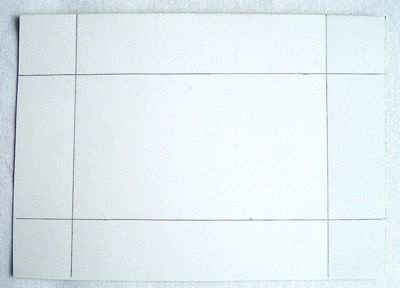
Now, make a score 1" from the edge on all four sides. (If you have a paper cutter with a scoring blade this is easy. If not, you can use a ruler and a bone-folder, or even a ruler and an empty ball-point pen to make the scoring.)
I've marked my score lines in heavy pencil here, so they're visible in this tutorial. You probably won't want to make any marks on your card.
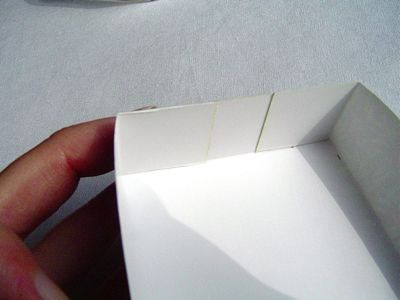
Fold the card along all four score-lines. Then, score and fold the other half of the card in the same way.
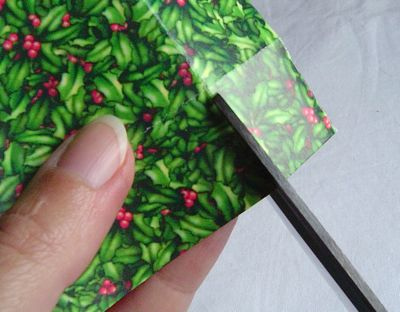
Now, at the shorter ends of each piece of card, you're going to make two small cuts, where the two folds intersect. The second photo explains this better than I'm doing.
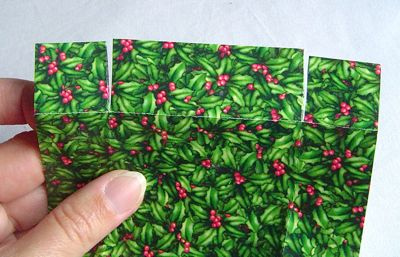
Put a little tab of double-stick tape on each of the resulting flaps.
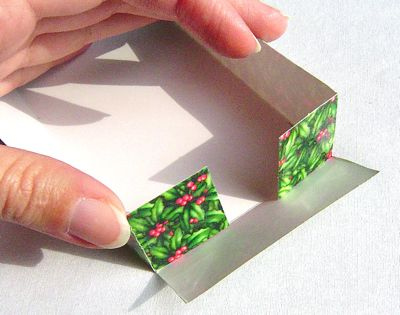
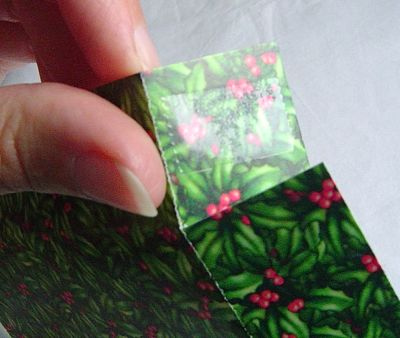
Now, fold up the long sides of your box, and fold these tabs in as shown.
. . . And fold up that end flap and press the tape to stick it in place.
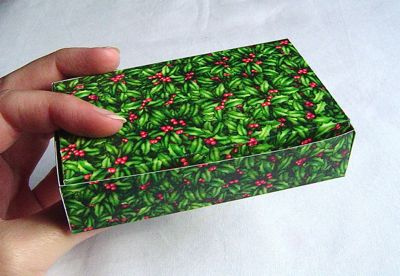
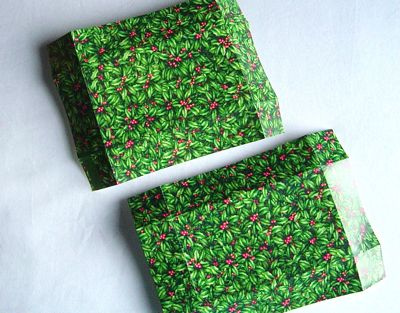
Make the other half of the box in the same way, and presto!
I can see these for little gifties, but also for cool holiday-dinner favors/placecards. And keep in mind that you can vary the size and depth of these by simply changing the location of your scores. You can score 2" from each edge, for example, and get a much smaller, deeper box - suitable for a gift of homemade truffles.

![[Valid RSS]](../../../sites/files_cp7/valid-rss.png "Validate my RSS feed")
Comments
This is awesome. I'm definitely going to be using this come Christmas time. I mentioned this tutorial on my blog: http://www.savvyhousekeeping.com/?p=122
Its a great idea but how do you get it to be so neat?
Myself being a beginner paper craft person finds this soooo easy and I have made 14 just in an hour. I was in box heaven. I have found several other sites but found them hard to understand. Thanks for making this easy for me.
Thank you for this tutorial, was really useful and the easiest to follow!
this box is so easy and helpful thank u
I absolutely love this! I can't tell you how many times I wished I could think of something useful to make with greeting cards. Thank you!
My mum used to teach handicapped people all sorts of crafts, boxes being one of them and as children, my siblings and I learnt as well. Ufortunately, I seem to have lost the skill not having done it for so long and sadly my mother is no longer with us. The lids on the boxes sorted fanned round on the top and I cannot think how this was done and wondered if there was any possibilty that anyone reading this could enlighten me
My mum used to teach handicapped people all sorts of crafts, boxes being one of them and as children, my siblings and I learnt as well. Ufortunately, I seem to have lost the skill not having done it for so long and sadly my mother is no longer with us. The lids on the boxes sorted fanned round on the top and I cannot think how this was done and wondered if there was any possibilty that anyone reading this could enlighten me
Sorry, Sue - I have not seen this technique myself. Maybe someone else will have details...
Sorry, Sue - I have not seen this technique myself. Maybe someone else will have details...
To hide the printed/handwritten message inside the card, lightly spray paint the inside of greeting card and allow to dry before making the box. Gold or silver looks nice inside the finished box. Spray paint can also cover unwanted words on the front of the cards.
LOVING THIS!!!!!! I stay home with our baby daughter now and I need to be as frugal as frugal gets! I'm really digging this idea THANKS!!!!
This is a great idea. I have been saving hundreds of old greeting cards for years and now I have a way of using them (If I have the time!)
Holy Moly that's clever! *Love* this idea.
Lovely nails btw. Usually us crafty types have ragged nails and cuticles. Or did you use a hand double? ha ha
Great tutorial. I like the pics. Good job. Thanks for sharing!
How great is that?! Now I'm glad I didn't throw away last year's cards yet :-)
wow!
I think I'll make some for christmas presents... good things come in small packages!
:)
Great tutorial! I have a bunch of cards to use :)
Brilliant! Thanks for sharing.
oooo, that's gooooood! and it even looks doable to a measureaphobe like me.
Oh I like this, I posted a different way to do this at my blog
http://scribbit.blogspot.com/2006/12/tiny-gift-boxes.html
but this makes a different sized box that would be great.
good tutoriul
Oh, this is very cool ~ what a great idea (and excellent instructions!)
Wow, thanks so much!
thanks for this idea... the pictures make it esay to follow i have been looking for tips like this on how to make this box.God Bless ya!
i have always wondered how to make these, i am so glad i know how know, it is cheap and a convenient way to use up your old unwanted cards.
also, if you are in search of cards, you can go to a thrift store, they always have old cards for very cheap!
The great mystery: How does it not fall apart?
Brilliant.
Only guy responding :D
Cool recycled craft idea. Thanks so much for sharing it.
I love these great little craft ideas that EVEN I can make! I am especially fond of ideas that include recycling! Thanks for sharing....I'm in on the comments late, but just in time for Christmas!
Holy moly! Made one using a blank card with a ballet photo on the front and it is divinely beautiful.
Will make a great little gift box for some holiday trinket!
This is one of the best tutorials I've ever seen. Easily followed with the written instructions and excellent photographs. Now I know how to box my homemade candies (fudge, truffles, etc.) for Christmas. Thanks bunches!!
EXCELLENT! Always looking for ways to reuse things. Love to get more information on making items such as this.
I like this box, but I have an box made with old christmas cards, - all sides, bottom, and top are stiched together with yarn in a v pattern - it resembles a treasure chest, as the sides all bow a bit. Help! I received it as a gift in 1979 ish, and have been looking for directions ever since. A woman had made them for a girl I worked with.
I don't know if this is where I can go for this help. But, thanks.
This is a great idea! Now I'll look at discount cards with the thought of possible gift boxes.
Oh what a lovely gift box !!!! Iam going to make one but make it like an old suitcase and use if for my school project
Thanks so much :)
CUTE!
I just finished making my own and it's adorable!
thanks for the idea!
grate you have no idea how it help me
Wow! great way to recycle paper. I am going to make a few jewellery gift boxes. Thanks for the brilliant idea
I have so much cards that means i can make a box out of the cards
thank you thank you
Wonderful! In a "stamp"art store i saw a little box like this used as a shadow box with a twig inside and a cut out bird stamp attached to the twig! Use the opposite side of the card for the inside of the box. (it had a little frame around it also. Thanks for sharing.
thanks it really helped me
THANK YOU for the simple directions! I found other directions on
another site but yours are much easier! I will use this project for
my weekday school class at church.
i love your boxes. it's fun, easy and works very well :D
Terrific! I have a bunch of cards that I didn't know what to do with. Thanks!
Hey that was sooo helpful!
I was trying to find a way to spruce up some butter cookies that I made for a friend and I have kept all my birthday and christmas cards from since I was ten so this was absoloutely perfect!
Perfect for I love you coupons
I LOVE THIS ! i made one in my class but it was way more complicated i thought this is aewsome thanks !
THIS IS GREAT IT HELP ME IN MY TECHNOLOGY CLASS AND THE RESULTS CAME OUT WONDERFULLY.
THANKS
BYE
this project comes in handy! glad i found you because it helps a lot!!! THX!!!
i looked in so many shops trying to find nice gift boxes ,
now i can make them myself, it's great!!
many thanks
Pages