You are here
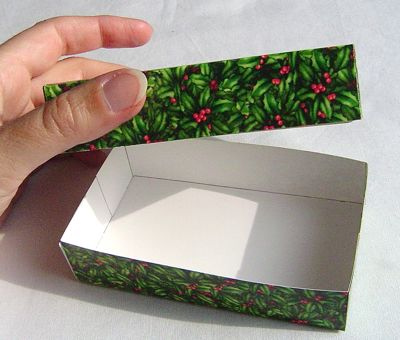
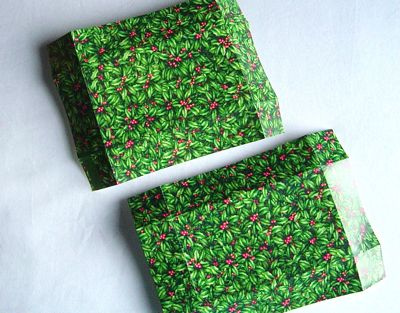
How to make a gift box from an old greeting card!
I was teaching a card-making class over the weekend, and the nicest woman ever said to me, "Have you tried making boxes from your old cards?"
Well, I hadn't, so she showed me the coolest method for converting an old greeting card into a spanking little gift box. And not only that, at the next day's class, she brought me a pile of blank greeting cards, so I could show this to the next Church of Craft meeting. Unbelievably kind! Thank you so much, Deanna.
So, this technique is so exciting, I had to share. You may not be ready to look at Christmas stuff yet, so just imagine a Halloween card in its place if you need to.

Start with a greeting card. If there's writing on the inside, you can glue-stick some paper over it to cover it up.
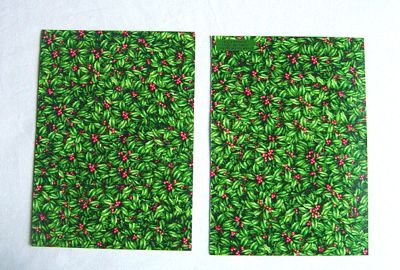
Cut the card in half along the fold.
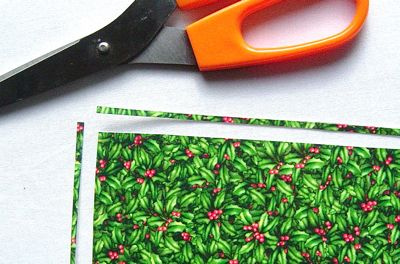
Take one half of the card. Trim about 1/8" off of one long side, and one short side. (If you have a paper cutter, of course, use that.) You do this so that the bottom of your box will be slightly smaller than the top, and they'll fit nicely together.
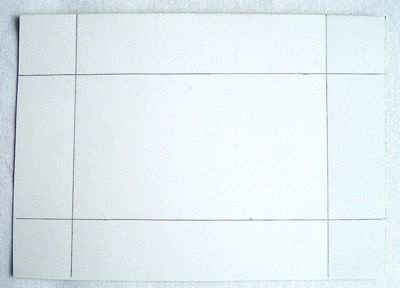
Now, make a score 1" from the edge on all four sides. (If you have a paper cutter with a scoring blade this is easy. If not, you can use a ruler and a bone-folder, or even a ruler and an empty ball-point pen to make the scoring.)
I've marked my score lines in heavy pencil here, so they're visible in this tutorial. You probably won't want to make any marks on your card.
Fold the card along all four score-lines. Then, score and fold the other half of the card in the same way.
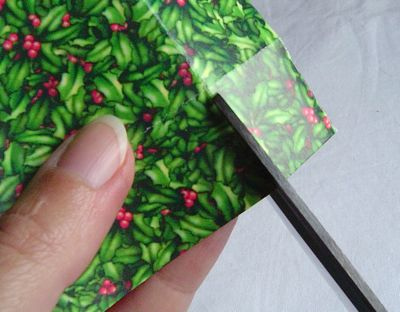
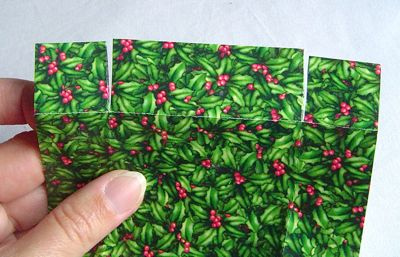
Now, at the shorter ends of each piece of card, you're going to make two small cuts, where the two folds intersect. The second photo explains this better than I'm doing.
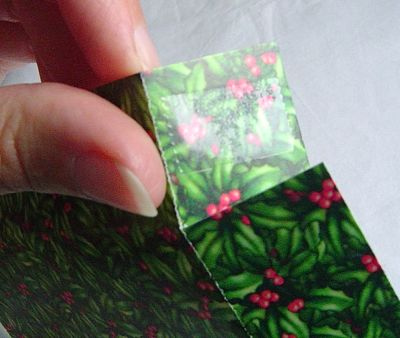
Put a little tab of double-stick tape on each of the resulting flaps.
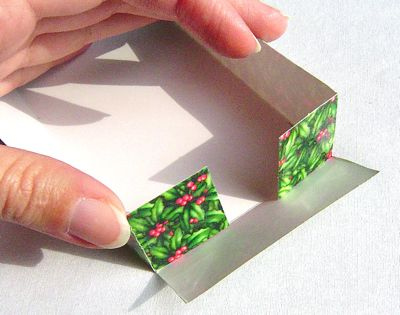
Now, fold up the long sides of your box, and fold these tabs in as shown.
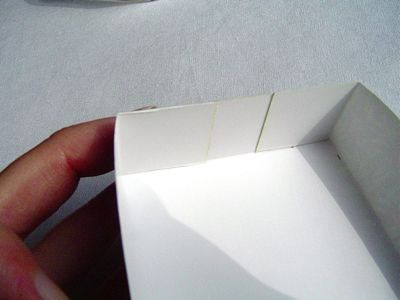
. . . And fold up that end flap and press the tape to stick it in place.
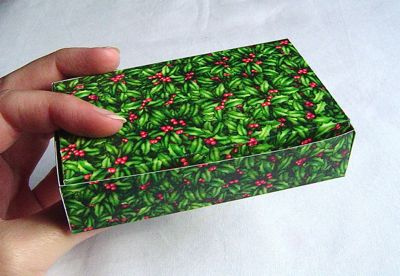
Make the other half of the box in the same way, and presto!
I can see these for little gifties, but also for cool holiday-dinner favors/placecards. And keep in mind that you can vary the size and depth of these by simply changing the location of your scores. You can score 2" from each edge, for example, and get a much smaller, deeper box - suitable for a gift of homemade truffles.

![[Valid RSS]](../../../sites/files_cp7/valid-rss.png "Validate my RSS feed")
Comments
Hiyaa thanks this is great i have had a fab time making these they are great gift ideas and thanks alot for sharing this with us the instuctions are easy to understand and i can now make my own instead of looking for the perfect box i can make them my self thanks again bye x
This is awesome. I'm definitely going to be using this come Christmas time. I mentioned this tutorial on my blog: http://www.savvyhousekeeping.com/?p=122
That is great! I have only made the small 2"x2" boxes from old cards, attaching a loop of cording to make Christmas tree ornaments. I always thought that was a great way display last year's colorful cards. This idea is awesome! thank you sharing and for the great information pics!!
we did this as a geometry project. it is a lot of fun.
Wow... will definitely try this!! :) I HAVE to!! :)
Thanks so much for the pictures and great instructions. This is exactly what I was looking for! Have a great day!
Thank you! I had forgotten how to make these because it has been years since i've done so. And now I have small gifts so they are needed. Thank you so much!
Myself being a beginner paper craft person finds this soooo easy and I have made 14 just in an hour. I was in box heaven. I have found several other sites but found them hard to understand. Thanks for making this easy for me.
Thank you! I had forgotten how to make these because it has been years since i’ve done so. And now I have small gifts so they are needed. Thank you so much!
Its a great idea but how do you get it to be so neat?
Thanks, I've been searching for something like this. It's perfect for the small gifts kids like to gife to teachers etc. Well done!
OMG that's is really good!!!! and it is a great idea!!!! i am going to use it no doubt!!!
I am looking for a box my grandma use to make back in the 50's. Top & bottom was hexagon shape, sideswere ( ) like that, they were crocheted together . She use to put hankies in it that she croched the edges. And give them as gifts. Let me know if you find any.
This is great! Very simple to follow the directions. How do you hide the signature though? I did one, and the signature is right there in the bottom of the box. Don't really like that. How can it be hidden?
Wow, thank you so much for this fab idea! Im getting Married and will be getting all the girls together to help make these boxes as my favor boxes for our Guests filled with wee chocolates! You are a real life saver! Much appreciated! x
Thank you for this tutorial, was really useful and the easiest to follow!
this box is so easy and helpful thank u
I absolutely love this! I can't tell you how many times I wished I could think of something useful to make with greeting cards. Thank you!
I've always wanted to know how to make these boxes. They make great fudge boxes.
LOVE IT!
I love this!
A girl I worked with showed me how to do this, I love it. She makes them all year long and then at Christmas she gathers them puts a couple of pieces of candy in them and takes them to different nursing homes. Such a neat idea and kids can help also.
Sorry. Not that crafty. But for those like me, I re-use Christmas cards as present tags. I may cut them down to size, or just use the portions I want . . . but they make excellent tags for next years gifts!
this is excellent and so easy, i have yet to try it but you have explained it so well, i'm just about to try it out... its going to be so much easier and cheaper than having to buy them cos sometimes you cant get the right size or style and it recycles old cards, thank you ever so much for passing this on to others, i for one am extremely greatfull, with only a few days to go before Christmas this is excellent to do with the children i look after once they have made their cookies and fudge for family members as presents they can then put them in their own little hand made boxes thank you a thousand times over
Amazing tutorial. I've made these before, but you explain it far better than I ever could have. :)
lovely....many thanks!
This was just perfect! My daughter, 6, bought a cute, little necklace for her friend for her birthday, but I didn't have a box. Because I'm not much of a card person, I ended up using two large index cards for the box and wrapped it in wrapping paper. It worked just fine for the purpose intended, and I didn't have to run out into town with 3 young children to find just a box! Thank you!
hay da box was relly awesome lol home work club thanks lol ily
wow it is simple & nice
Wow that is amazing, I am going to get my kids trying out making these after the festive season, it will keep them entertained for hours.
Thank you for the great instructions. I received one from a friend years ago and have always wanted to try and make them. Your directions make this easy for me.
Thanks for sharing,
Anne
the best ever
Hi Diane.. I absolutely LOVE this idea... I was looking online for how to make little boxes to fit my little Christmas pamper kits in and your tutorial is perfect...
not only is it quick and easy, its also recycling which I love!!
Thanx!!
Thanks for the great instructions. I used to make these boxes years ago but I forgot how to do it! They're great in a craft fair, too. I used to sell them for a quarter a piece. Linda
I did this for some gift cards this morning before the family woke up. It was so easy! Thanks for posting this wonderful simple box idea and Merry Christmas!
Thanks
I use small animals, people, etc. cut from cards to glue into the bottom box in a 3-d effect to make scenes, etc. the bottom box is made of a card with a scene on it for background. kids love them, so do adults!!
I've been struggling all afternoon to try to make some gift boxes and then I came across your demo and it is wonderful!! I have made three pretty boxes already and I am so pleased with them! Thank you very much!
I have used last years Christmas card with the writing on the inside and given back to the sender with candy or a special treat. Makes the box even more personal.
Brilliant, perfect for my peppermint creams and Christmassy too !
AWESOME! It looks so easy, im gonna make it for my mum for christmas!! thnx
thank you for posting! it was just what i needed...i want to make prayer request boxes for the ladies at my church and in my family
nice
Was looking for something for my students to put their reward tickets in, they love these! Always looking for something to make the students feel special, this was perfect!
Help! I want to print these instructions!! Not user friendly for me?!
Can you give me some more details as to what happens when you try to print these, Linda? I'd be able to help you better if I had more specifics. Are you getting some kind of error message? And please tell me what web browser you're using.
Very interesting i'm going to try them
Hi Diane, Thank you so much for showing how to create a 'simple' yet an easy box.I made a beautiful circle card for my aunt/uncle for their 50th anniversary with photos of them, but couldn't find a suitable box. Alas!I couldn't give it on that day.But when I googled, I found your box, easy/interesting to make.I'll go shopping straightway and get a nice A3 cardstock to match my card and will make a beautiful box with embellishments (wow! I'm getting ideas on my head already...)and present it to them and give them a big pleasant surprise and a smile!! Thanks A LOT!
Jebby
Hi, and bless you. I thank you for the best and EASY little box to make I have come across.
I have tons of 4"x 6" glossy photo paper left from all of my printer cartridge purchases and your little boxes are just a perfect size to use. They look so great and professional. I use my glue gun instead of tape but it is worth taking the extra time.I can now make as many boxes as I like to use for many many things!! Oh, I also cut the size down for some,in order to make a square design too.
Thank you, thank you.
Kind regards
Vivienne
Thanks so much!! Finally found a box that is not only simple to make, but exactly what I am looking for...
Pages