Blogs


Hexie Sewing Set English Paper Piecing Pattern


So, this pattern is born of my penchant for starting and abandoning hexie quilts. I'm the proud owner of quite a few pieces of random English paper piecing in various shapes and sizes. They sit neatly folded in their ziploc bags, silently reproaching me for my lack of follow-through. I'm sure at least some of you can feel this particular pain, right?

Anyway. I finally decided early this year that I was going to take these pieces of patchwork and make things with them, thereby letting myself off the hook from completing them as quilts. And this Hexie Sewing Set is the first result.

The three pieces are: a needle book, a scissor case (custom-sized to your favorite scissors), and a pin cushion. The PDF pattern has complete piecing and construction instructions for all three, and it's loaded with step-by-step photos and diagrams. It's also extremely beginner-friendly. If you can sew a straight seam on your machine, you can make this set.

You can get the PDF (and details on sizes) over in my shop.


Hexie Sewing Set English Paper Piecing Pattern


Never feel bad about abandoning your hexie quilt-in-progress, my friends. There's always something good to make with whatever you ended up piecing!


Today, I'll share a nice time-saving method for basting hexagons. You start with fabric squares that you've cut with your ruler and rotary cutter, and then you baste those squares right to your hexie templates.

This method is useful for projects where you need to make a whole lot of patches – and you can use it with really any shape, not just hexies.

To be honest, this isn't my favorite basting method, simply because it results in a slightly bulkier patch. (Although for most projects, this extra bulk wouldn't present any problems. The only time I think the bulk would present issues is when you wanted to do a lot of intricate quilting on a project.)

…But I do know a lot of EPP-ers who love to baste this way, so I thought I'd share it. If there was ever a "to each their own" craft, it's EPP!

Happy Stitching, and Happy Weekend!


Pumpkin Patch Snack Mat


I have sketchbooks filled with EPP ideas, and I spend a lot of train and bus time doodling shapes. There's a page in one of these books where I simply scrawled: "OMG, hexie pumpkins!"

Well, after further noodling, I decided that octagons were ultimately more pumpkinlike, and also a great shape for showcasing interesting Halloween fabrics. And so this Pumpkin Patch Snack Mat pattern was born.


Pumpkin Patch Snack Mat


This piece is 10" x 10" – that's plenty big enough for a hot cider and pumpkin muffin, or you can place a small pumpkin on it and use it as side-table decor.

It's also a very easy project, with simple quilting and (if I do say so mydangself) a pretty smart, foolproof backing method. If you've only done EPP with hexies, you'll love working with octagons. And if you start this now, I know you can finish well before Halloween.


Pumpkin Patch Snack Mat


The pumpkin faces are my favorite detail. The nice people at Tsukineko/Imagine Crafts sent me some samples of their Memento Luxe stamp pads to play with, and I carved some dead-simple stamps from a dollar-store eraser I had on hand. The ink gave excellent coverage on the fabric, and with a little heat-set from my iron, is now nice and permanent.

(The pattern, incidentally, gives you full instructions on stamp-cutting, and has eight face templates you can follow if you like. Or, make up your own!)


Pumpkin Patch Snack MatThe pattern is available as a PDF in my shop, and it's replete with photos and videos to make the whole process of piecing and assembly crystal clear.

So, Happy Halloween Snacking!


The Gemstone Pillow: English Paper Piecing PDF Pattern


It was one of those creative kismet stories…

I was noodling in my sketchbook, playing with octagon shapes for a new English paper pieced quilt block. I drew an octagon that was a little elongated, and the thought drifted through my mind: "Huh. That looks a lot like one of those emerald-cut gemstones."

…So I kept noodling, and before long, it looked exactly like one of those emerald-cut gemstones. And I had the makings of a new EPP pattern.

The very next day (I kid you not), RJR Fabrics asked me if I'd like some of their Cotton Supreme solids to work with and blog about. And I was all: "Ummm, YES PLEASE."

The Gemstone Pillow: English Paper Piecing PDF PatternAnd here's the result: The Gemstone Pillow, my latest EPP-and-applique pattern.

I do love how this project turned out. If you've played with some hexies, this is a project to challenge your EPP skills a little. We're working with odd shapes here, but fear not – the pattern templates tell you everything you need to know in order to get all the pieces arranged correctly. Really, if you can thread a needle and sew a straight machine seam, you can absolutely make this pillow.

I could see this design in so many cool variations – you could make those gemstones all the same color. You could use just two colors. You could use shades of grey and make them all resemble diamonds. You could put your gemstones on a print background. You could arrange them differently. The patten gives you all the templates and techniques, and you can take off from there.


The Gemstone Pillow: English Paper Piecing PDF Pattern


You can get all the pattern details over at my shop. And you can see what my fellow blog-hoppers have made over here.

The Gemstone PillowIt was awesome to work with the Cotton Supreme colors here. The success of this design relies on having enough contrast between the light and dark values of each color, and RJR has so many hues, I was able to get a perfect set. At left is a list of all the colors I used.

The Cotton Supremes are lovely to work with for EPP. They're nice and soft, and hold a finger-pressed crease beautifully, which makes for easy, precise basting. I've got some scraps left over that I can't wait to use in other projects.

(As you can see, Pushkin found them nice for Laying Upon as well.)


The Gemstone Pillow: English Paper Piecing PDF Pattern


What to Do When Your Hand-Sewing Thread Knots Up


Sooner or later, every hand-sewist ends up getting an unexpected knot in their thread. This doesn't mean you're any kind of a bad sewist! It's just simple physics at work.

Luckily, though, there are some ways you can do magical counter-physics and either prevent or solve those knots. And that's what this post is all about.


It's all in the twist…

The number one reason your thread ends up in knots is that you're twisting it. You're not doing this consciously or anything – it happens in tiny little increments during those moments you let go of your needle and pick it back up again.

Most of us, in those moments, turn the needle just a little. And those tiny turns add up, over a lot of stitches, into twisted thread. This is especially true with stitches like whipstitch, where you're moving the needle the same direction over and over.


How to Knotted Thread While Hand Sewing


How do you know your thread is twisting? Try this: Hold your work in one hand and your needle in the other. Let the thread hang between them. Now, bring your hands slowly together. Does that hanging thread immediately begin twisting up on itself? Then you're twisting it while sewing, my friend!

If your thread is twisting upon itself like this, imagine what happens when you try to pull all that twisty mess through your fabric. Twisted-up thread has no choice but to get wadded-up and knotted-up.


How to Knotted Thread While Hand Sewing

Preventing that twist

…So, the easiest way to keep your thread from knotting in the first place? Counteract that twist. Cultivate a habit of spinning your needle in the opposite direction until your thread smooths out. And do this any time you see that twisting start to form.

How do you know which direction is opposite? Easy: if the twisting gets worse as you twirl your needle, you're twirling in the wrong direction, Twirl in the opposite direction, and you'll see all that twisting fall out of your thread. Then, proceed with stitching.


How to Knotted Thread While Hand Sewing

What if the danged thread knots up anyway?

Don't worry – luckily, the knots that form from twisted thread are almost always one of two kinds, and both are quite fixable.

The first and most common knot looks like a mess of thread, as you see above. Often, this thing isn't really a knot at all – it's just a tangle. But I've seen many sewists turn it into a knot when they yank on the thread and try to force it to pull through the fabric. Don't do that!


How to Knotted Thread While Hand Sewing


…Instead, the minute you see that messy tangle forming and the thread starts resisting your pull, stop! Set down your needle and gently take the tangly stuff in your fingers. Then pull it gently toward you, and away from the fabric, This usually untangles the tangle and prevents the knot from solidifying. Then you can ease the stitch through and then un-twist your thread as we discussed above.


How to Knotted Thread While Hand Sewing


The other common knot looks like a little loop of thread with a knot in it. It's also easy to fix.

Again, the minute you see this knot happen, stop what you're doing! Take a deep breath and relax. The more gently you handle the thread at this point, the better chance you have of fixing this knot. If you get all angsty and try to force that thread through the fabric, you'll end up tightening the knot and making it irreparable.


How to Knotted Thread While Hand Sewing


So, insert your needle in that loop. (If your thread is very twisted, it may take a little doing to locate the loop. If you have some reading glasses or a magnifier, grab 'em – they really help.)

With your needle through that loop, gently pull the needle away from the fabric, You should see the knot begin to slide toward that needle. When the knot reaches the needle, stop pulling and remove the needle.

What remains now looks like a knot, but is really just a tiny clump of twisted thread. Take it gently in your fingers and continue tugging it toward the bend in the thread. You should feel that knot untangle itself under your fingers. Neat, huh?


What to Do When Your Hand-Sewing Thread Knots Up

If the knot won't come out…

Hey, it happens. The best thing to do in these cases is figure out how to move forward. Sometimes you can cut the thread so that you have two fairly long strands – one hanging from each side of the work. Then you can tie those in a double-knot with your fingers, cut the ends, and start sewing again with a freshly-threaded needle.

Sometimes your knot can't be cut. You're stuck with a tangle of thread on the back of your work. If you still have a length of usable thread on your needle, you can always lay the tangly stuff flat against your seam line, and continue your seam right over the top of it as shown above. That's not a pretty fix, but it secures the seam and saves you from having to rip the whole thing out and start over.


What to Do When Your Hand-Sewing Thread Knots Up

Other little tricks to try

Use shorter strands of thread! It's very normal to want to use the longest strand of thread possible, so you won't have to stop and re-thread your needle anytime soon. The problem is, the longer your thread, the more room there is for twisting – and also, the more beat-up your thread can get over time. Think of it this way: your thread is getting repeatedly dragged through itty bitty spaces, and being abraded by the fabric (and paper templates, if you're EPP-ing) all along the way. That abuse adds up, and thread that's beat-up is much more likely to tangle.

So, learn to love re-threading a little more. Get yourself one of these dandy needle threaders. And work with strands of thread that are no more than about 18" in length. It makes a huge difference.


Get some thread conditioner. I adore my Thread Heaven, which is a mix of wax and oils. You pass your strand of thread over its surface, and then rub the thread a few times to work the stuff in. This gives your thread extra smoothness and resiliency and really cuts down on tangles. With this stuff and the needle-counter-twirling technique above, I almost never have to deal with knots.

OK, holy crap – when I sat down to write this post, I had no intention of writing a doctoral dissertation, but I see I have. Is there some kind of award for Nerdiest Blog Post About Thread Knotting EVER? Because I want one.

Flower POW Mug Rug: an EPP Pattern


So, today I finally get to announce something I've been working on behind-the-scenes since January. I've opened a little pattern store for English paper piecing patterns!

As you may have gathered – ahem-hard-to-miss-ahem – I'm pretty besotted with EPP. It's one of the most soothing crafts ever. It's simple to learn, and lets you turn out perfect patchwork without having to do any measuring or point-matching. The paper does all that work for you, and you just get to chill out and stitch and watch West Wing.


Flower POW Mug Rug: an EPP Pattern


The one thing I've always struggled with in EPP, however, is the time commitment. As much as I love my hand-sewing time, I also want to finish my projects and use them! I've started no fewer than four hexie quilts, and ended up giving up on all of them. I figure there have to be others out there like me.

That's why I started developing patterns for smaller EPP projects – things that let you enjoy this delightful process, and also have an awesome finished item within the same calendar year. :-)


Flower POW Mug Rug: an EPP Pattern


I'll share my patterns in detail one at a time over a series of posts. This one is the first one I came up with – and I call it the Flower POW Mug Rug. I love hexies, but EPP lends itself to all kinds of different shapes, so I wanted to make some things that let me play with that.

…So in this pattern, you get to piece with diamonds and triangles, and then add an outer border of scallops. (Can you make curved edges with EPP? Oh, absolutely - it's easy!)


Flower POW Mug Rug: EPP Pattern


This project is also fun because it can be entirely hand-sewn. As in, you don't need a sewing-machine to make it, unless you want to machine-quilt it.

And it's a pretty quick project – I can make this from start to finish in about 5 1/2 hours. (Remember, hand-sewing moves at a different kind of time-scale than machine-sewing. Hand-sewing is also why Netflix was invented.)


Flower POW Mug Rug: an EPP Pattern
You can get your copy of this pattern at my online store.

OK. I'm going to go have a mid-day coffee to celebrate!


Half Hexie Star Table Runner


A Little Note: This tutorial is my entry in the now-concluded 12 Hexies or Less Blog Hop. I was finishing it up on the morning everything changed. Now that things are beginning their slow march toward almost-normal, I wanted to share this how-to. It's a project I'm really happy with, and I wanted to be part of this hop, even extremely late! Do take a look at the linky at the bottom of this post to see the awesome 12-hexie projects the other blog-hoppers made.


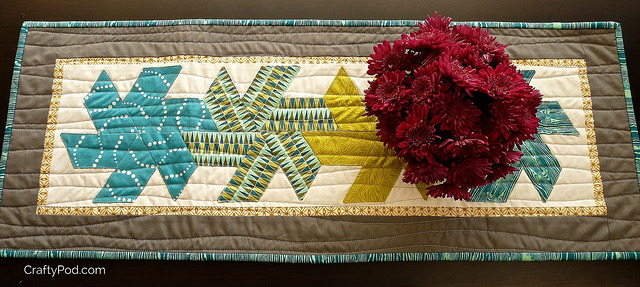
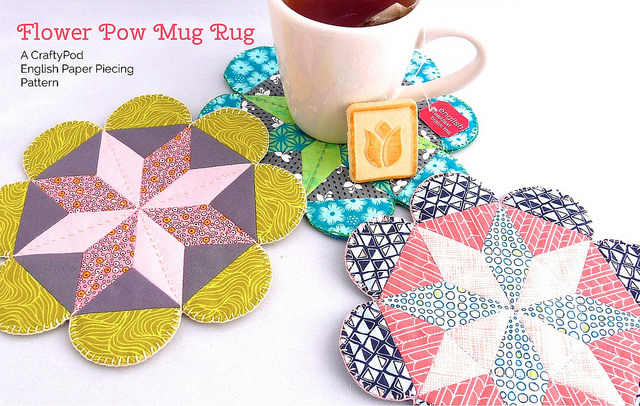
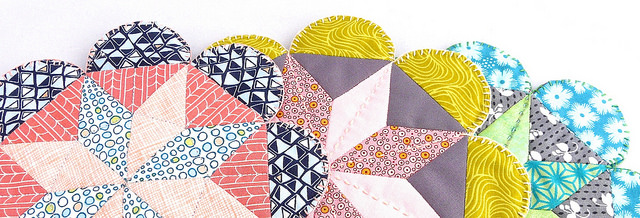
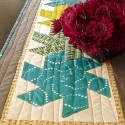
For my entry in the 12 Hexies or Less Blog Hop, I initially decided I wanted to do something with quite-large hexies. But after a lot of sketching and finagling, I decided to cut my hexies in half. That way, I could re-arrange them into star shapes.

(I loves me some half hexies. You can do so many cool things with them.)


Half Hexie Star Table Runner


You'll Need:

  • Downloadable template (or die-cutter, see below)
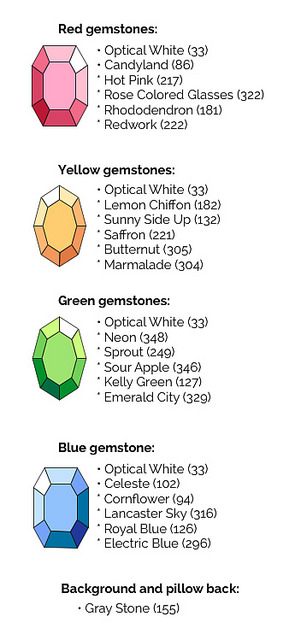
  • 4 fat eighths of coordinating prints (stars)
  • 1/3 yard of Fabric A (center of top)
  • 1/8 yard of Fabric B (inner border)
  • 1/8 yard of Fabric C (outer border)
  • 1/2 yard of Fabric D (backing)
  • 1/4 yard of binding fabric
  • 15" x 35" piece of batting
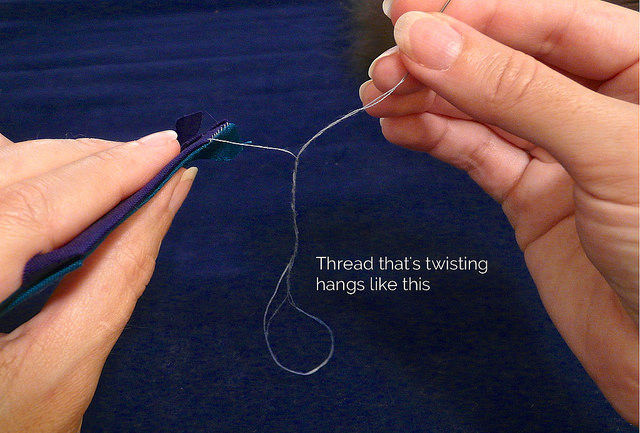
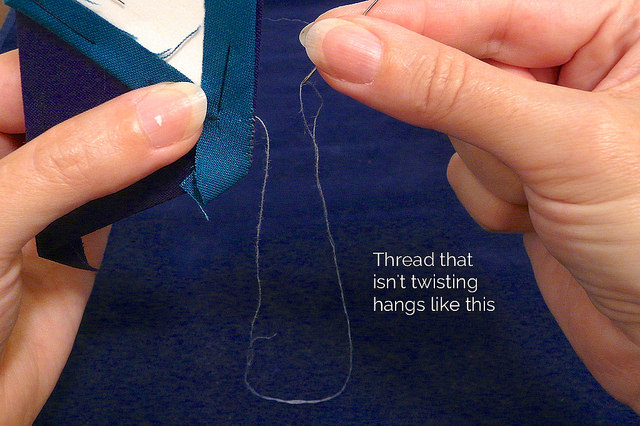
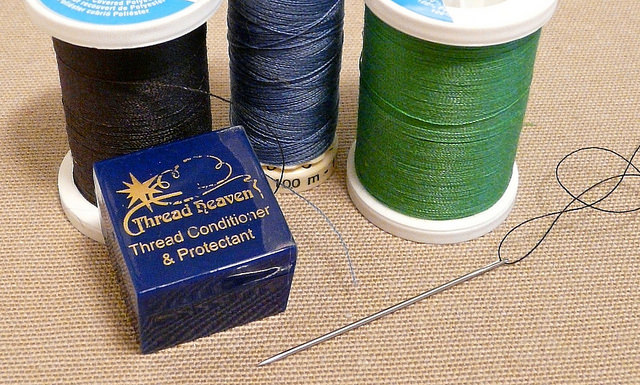
  • Coordinating thread


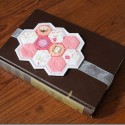
Finished size: 12" x 31 1/2"


Half Hexie Star Table Runner Tutorial


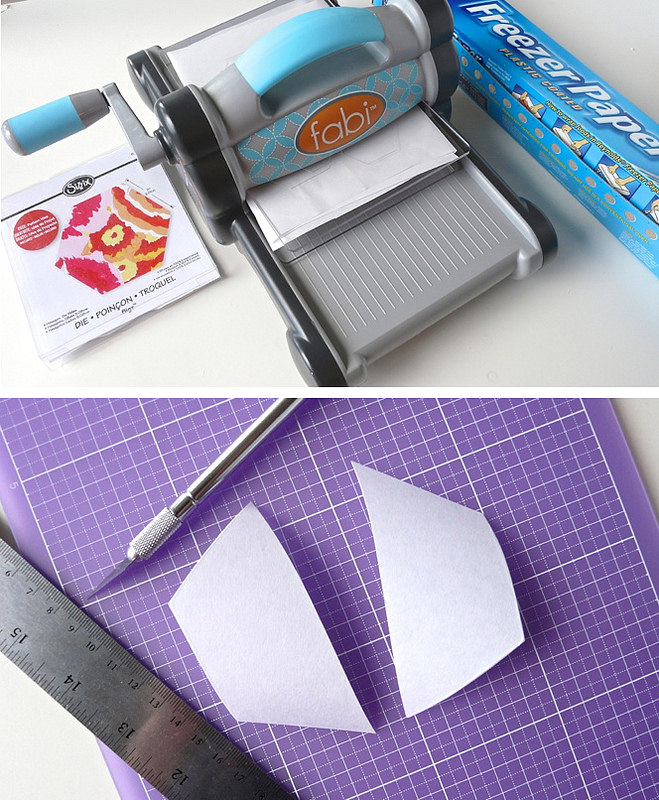
I used my Sizzix Fabi and their 2" hexie die to cut some templates from freezer paper. This was great, because usually I have to trace a shape over and over on the freezer paper and cut them out one by one. Here, I just hacked my freezer paper into twelve pieces and ran them through the Sizzix. Then I used a ruler and craft knife to cut each hexie in half from point to point. That kind of accuracy makes a huge difference when you're working with this EPP star shape.

(I also made you a downloadable template in case you don't have a die cutter.)

Half Hexie Star Table Runner Tutorial


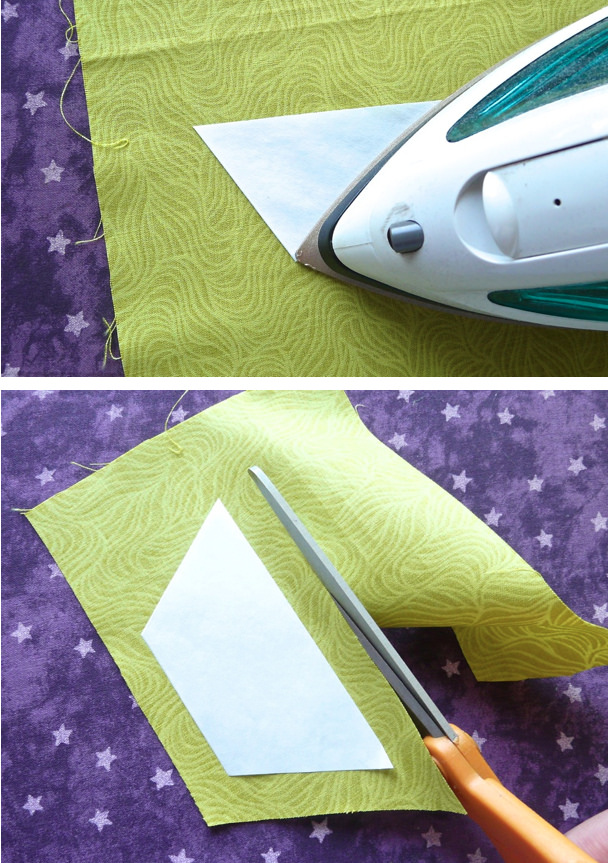
Freezer paper templates are wonderful when you're working with larger shapes in EPP. You just place the shiny side of the paper against the wrong side of the fabric and press it with an iron. That lightly fuses the paper and fabric together, and then you just trim the fabric so there's about a 3/8" margin all the way around.


Half Hexie Star Table Runner Tutorial


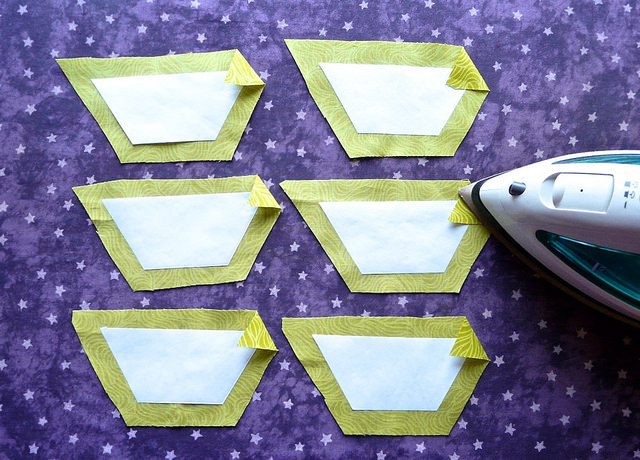
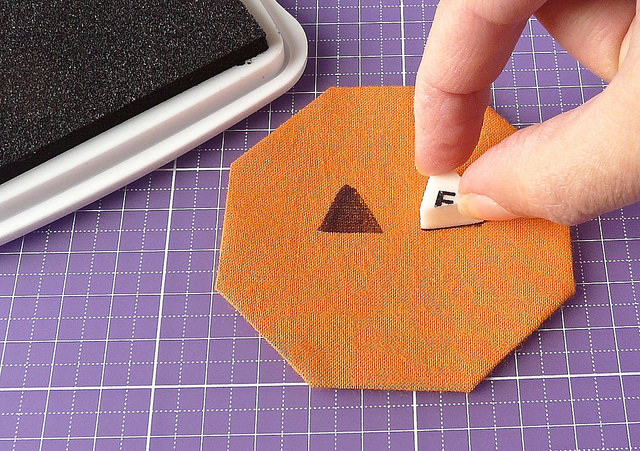
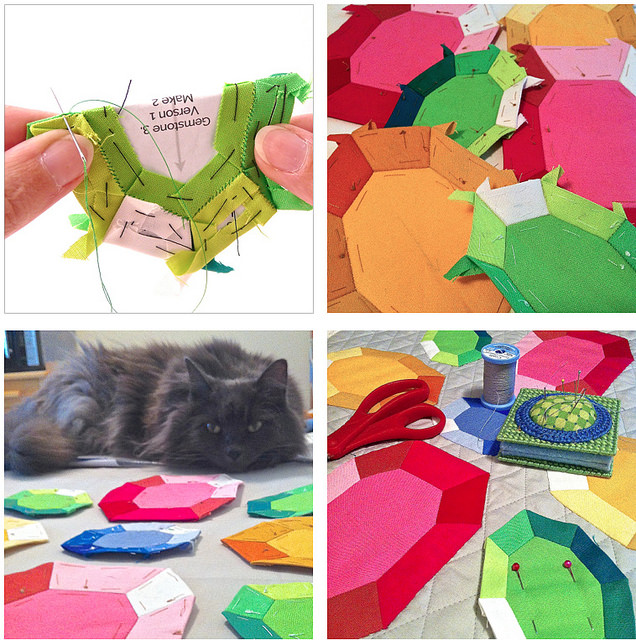
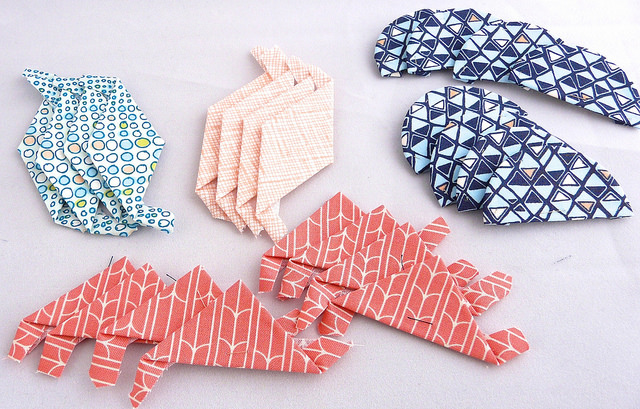
For basting, I just have one little tricky-trick for you, and then things are pretty straightforward. Before you baste, take a moment and press one corner of each fabric shape down, like you see here. Orient your patches with the long edge at the top, and then press the right-hand corner. Make sure all your templates are oriented like this, and make sure you're always pressing that same corner. That'll make sense in a moment, I promise.


Half Hexie Star Table Runner Tutorial


For templates this size, I always baste through both the paper and fabric, using fairly long stitches. You don't need any precise arrangement of stitches here; just make sure you get a stitch at each corner to hold the fabric edges down, and add an extra stitch or two along the long edges.

You can see this kind of basting in action in this video if you skip ahead to the 3:57 mark.


Half Hexie Star Table Runner Tutorial


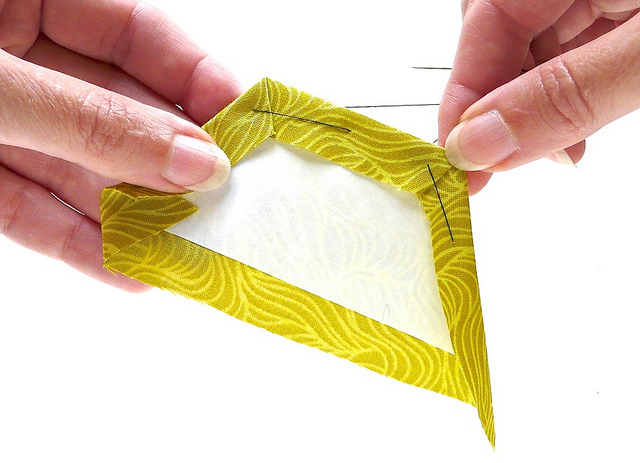
Now, remember that one corner we pressed down? When you baste that corner, fold the two edges of the fabric over the pressed part, as shown here. Secure the two edges with a basting stitch. This creates a nice, finished corner, which we'll place at the outer edges of each star.

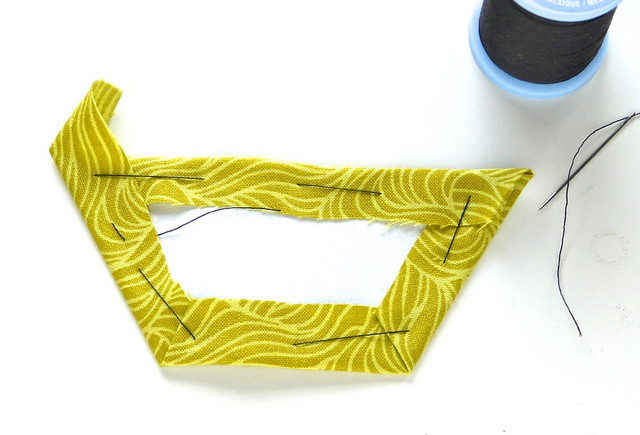
Here's a fully-basted patch. See how one corner is finished, and the other has a "flag" of fabric sticking out of it? Good! This is what you want.


Half Hexie Star Table Runner Tutorial

Half Hexie Star Table Runner Tutorial

Half Hexie Star Table Runner Tutorial


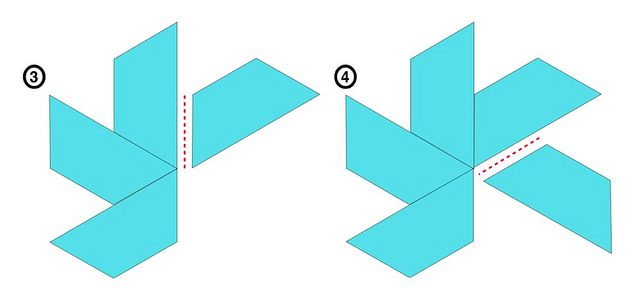
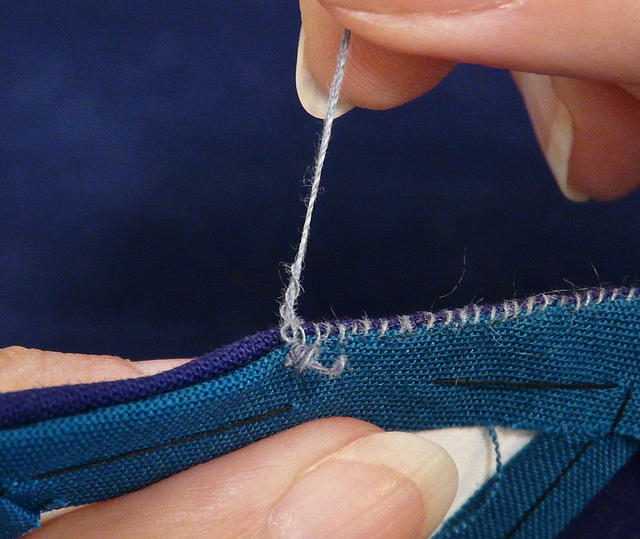
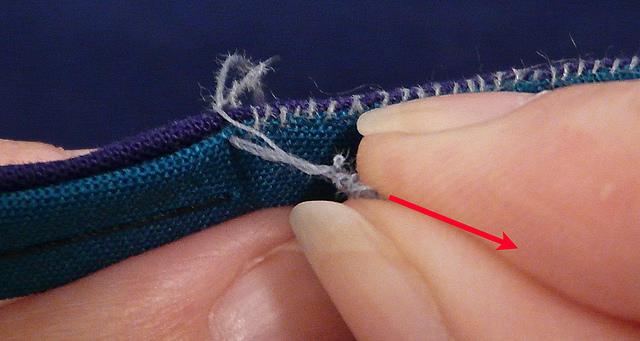
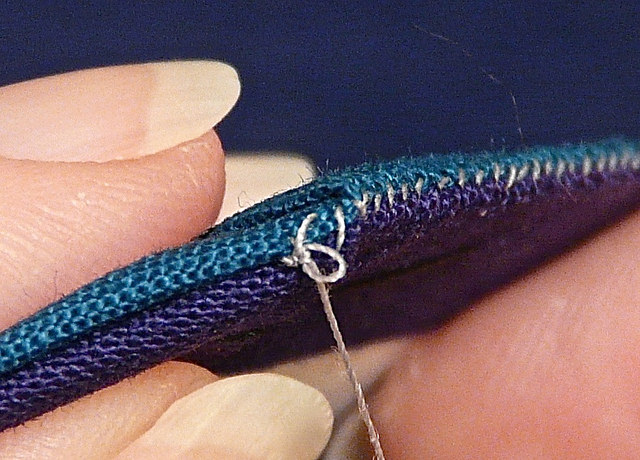
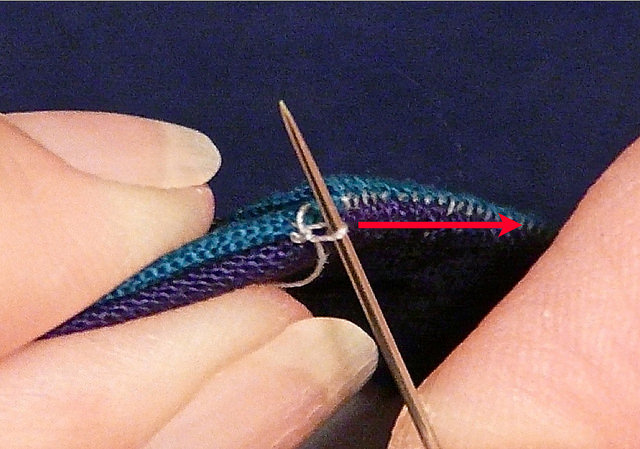
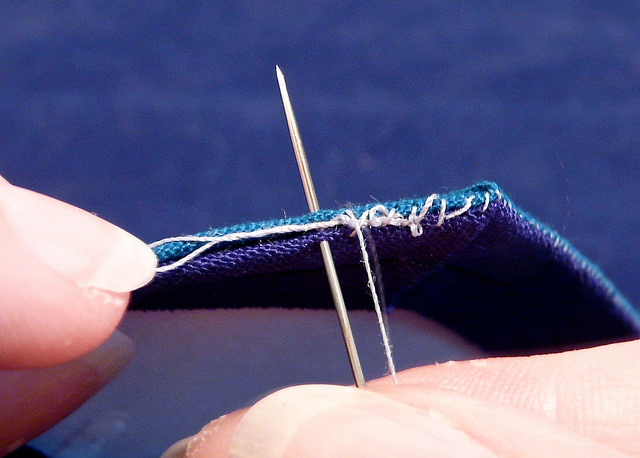
Sew the patches together with a whip stitch. (I have a sewing basics video over here.) There's one really important trick to making these half-hexie stars, and here it is:

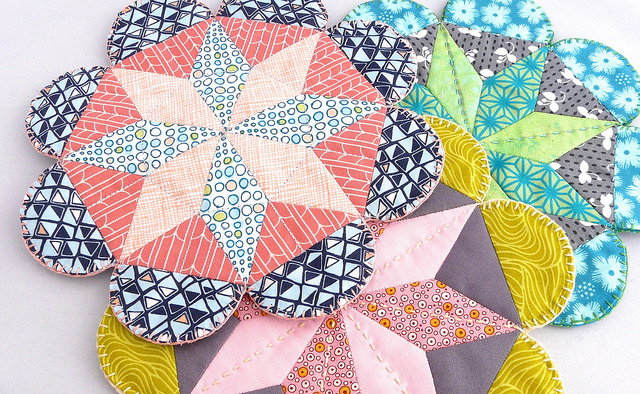
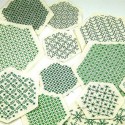
Each star has to be assembled in exactly the same way, or your stars won't nest together. I strongly recommend that you make your first star, and then keep it in front of you as you make the others. so you can make 100% sure that all those half-hexies are facing in exactly the same direction.


Half Hexie Star Table Runner Tutorial


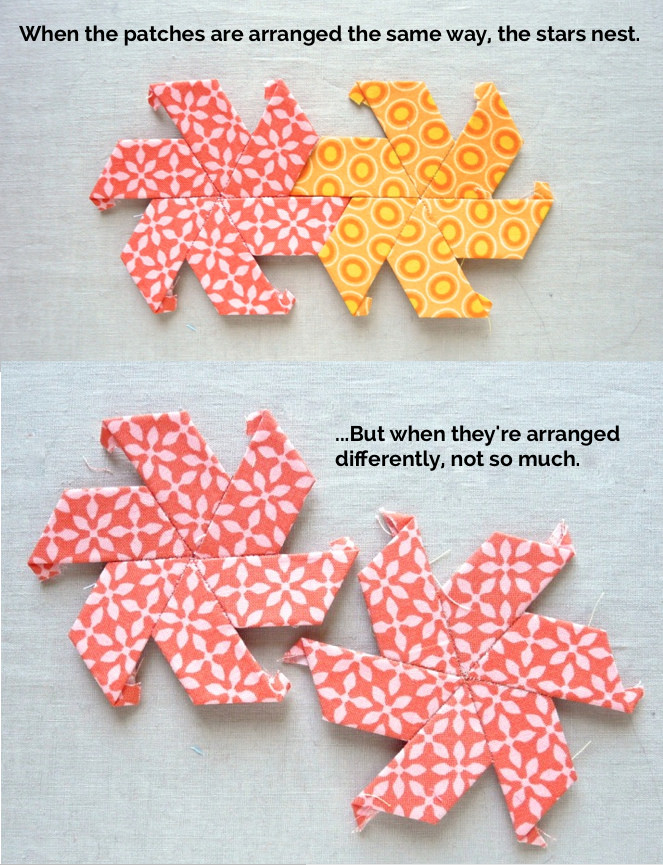
Just to illustrate what can go wrong - see how I made these two stars with the patches facing in different directions? They won't fit together now.


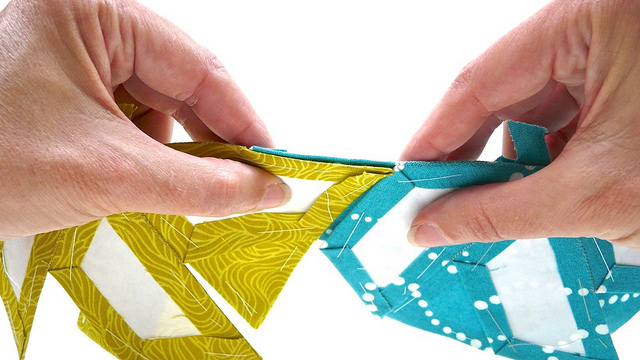
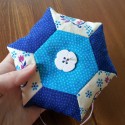
As you sew the finished stars together, it's easiest to start by nesting them together on your work surface, and then flip one over the other so their right sides are together and the edge you need to sew is lined up. It's easiest to show you this in motion, so I made an animated GIF (above). If you're reading this via email subscription or RSS reader, it's possible that you might need to click through to the post to see the animation. (And you really should, because I'm pretty dang proud of it!)

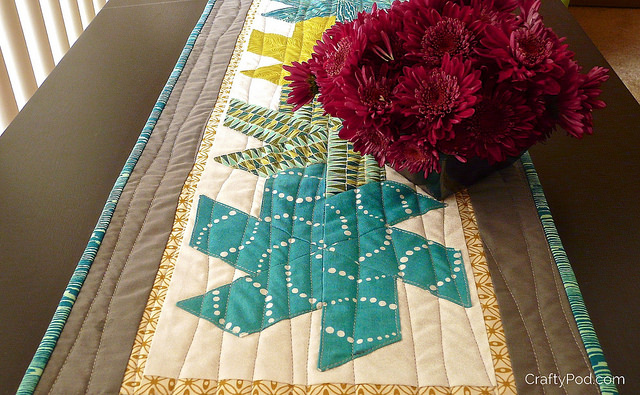
You can also see here how, as I assembled my stars, I made sure that those finished corners faced to the outer edges of the star, and the corners with "flags" aimed toward the center. See how those little flags all nest together at the center?


Half Hexie Star Table Runner Tutorial


Feel free to fold the stars any way you need to so you can reach these tricky little internal seams. You can't hurt the pieces, and the freezer paper handles folding and unfolding like a champ.


Half Hexie Star Table Runner Tutorial

Half Hexie Star Table Runner Tutorial


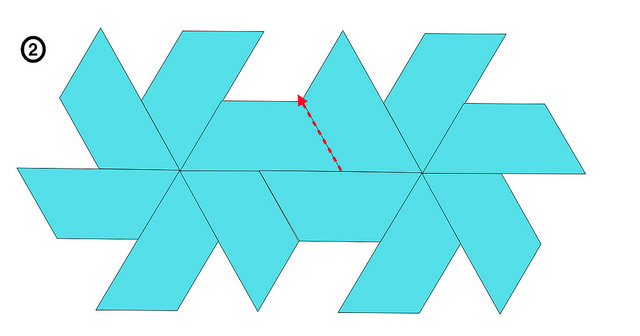
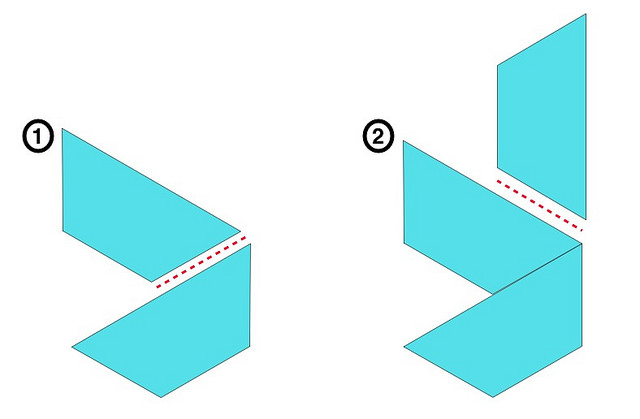
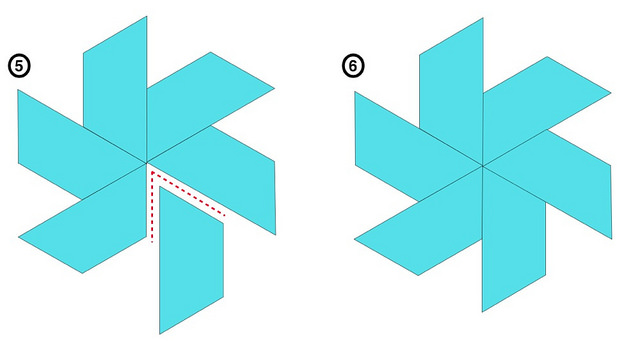
I find it easiest to approach the star-joining in two steps, like this.

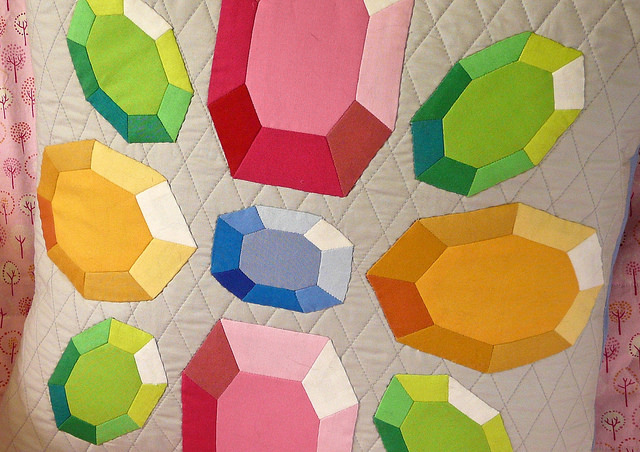
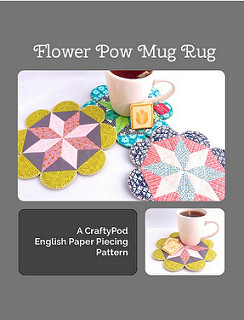
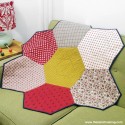
My table runner has four stars in it, in keeping with the 12 hexie limit of this blog hop. If you wanted a longer runner, you could always add more stars. Each star requires three hexagons, each cut in half.

With all the stars sewn together, you have a nice, big applique unit. Go ahead and press the whole thing, take out all the basting stitches, and peel out the paper templates. Then press the whole thing again, making sure all the seam allowances are flat and none are visible from the front side.

(There's a video on removing the basting and templates over here.)


Half Hexie Star Table Runner


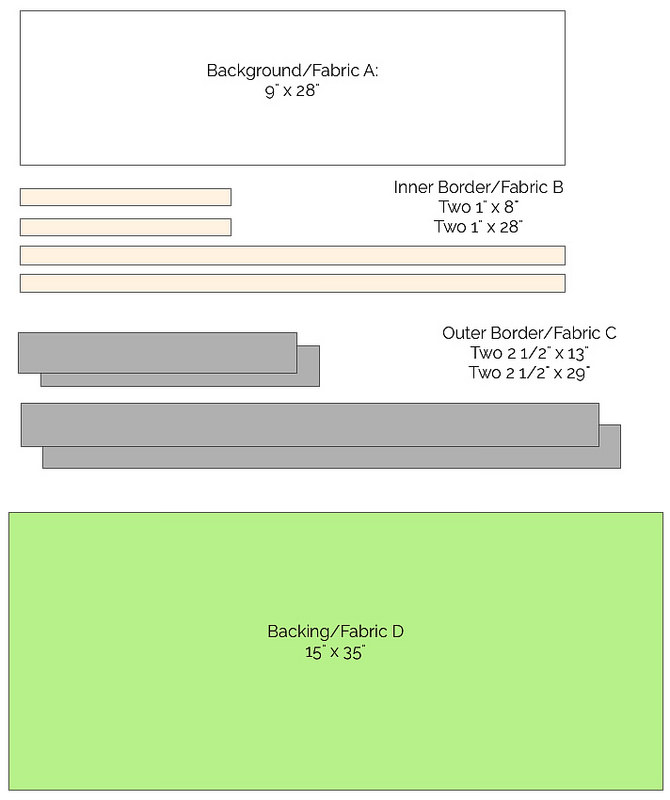
Here are the rest of the pieces to cut for the runner. You'll also need 1/4 yard of binding fabric.


Half Hexie Star Table Runner

Center your star applique on the Fabric A piece and pin it all over. (I like to use short applique pins so I don't have to move them around as I sew.) Sew 1/8" from all edges.

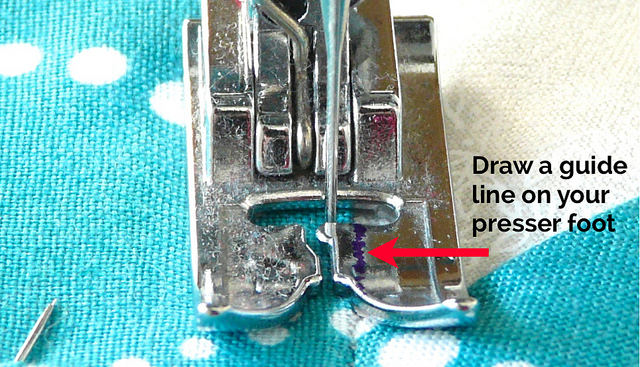
Some presser feet have handy guide lines on them so you can easily line up that 1/8" seam. If yours doesn't, I highly recommend drawing one on with a fine-point Sharpie, as I've done here. Just put your needle in the edge of the fabric where you need it, make sure it's straight, and then carefully draw a line on your presser foot that matches the edge of the fabric, as shown above. (Later, when you're done sewing, that line will come right off with some rubbing alcohol.)


Half Hexie Star Table Runner


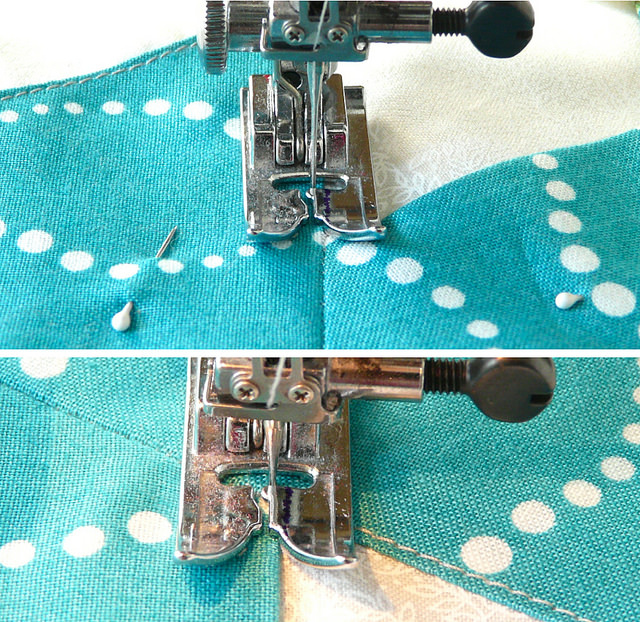
Because of the starry shape of this applique, you'll be sewing a twisty, turny seam. At each corner, stop sewing 1/8" from the corner or point, making sure your needle is in the fabric. Then lift the presser foot and pivot the project so you can line that guide line on your presser foot with the next edge of the fabric. Then drop the presser foot again and continue sewing. Take your time, and if your machine has a sewing speed control, you might want to crank it down to a slow setting.


Half Hexie Star Table Runner


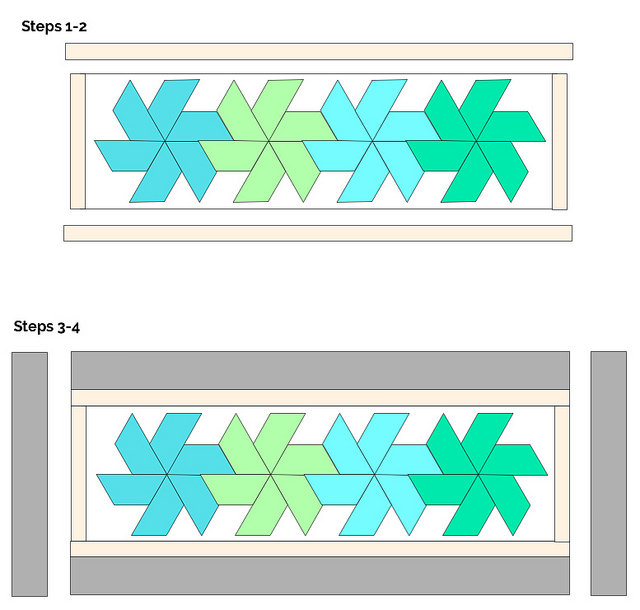
The rest of the runner top goes together like this. 1/4" seam allowances, of course.


Half Hexie Star Table Runner


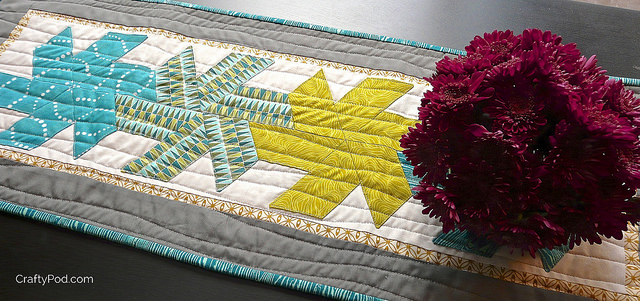
From there, sandwich the top, batting, and backing together and baste them with either safety pins or long hand stitches. Quilt the whole thing as you like. I used some simple, slightly wavy lines following the length of the runner. Then square the whole thing and add a binding.

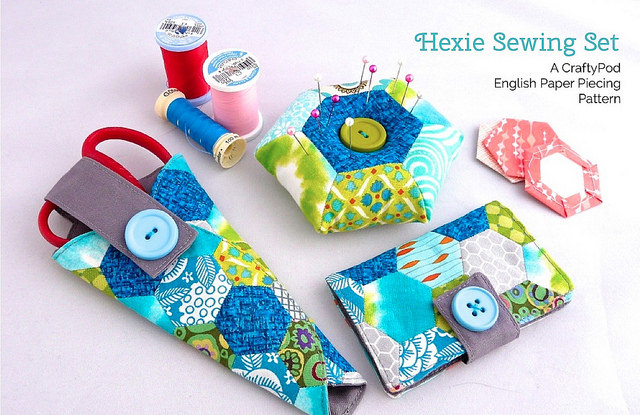
...And you're done! Have fun with your hexies – below are a bunch of other quick projects to try out:


Pages