Blogs


Kaleidoscope Pillows

I had such a great time coming up with this project for Spoonflower. I've been obsessing lately about kaleidoscopes, and how they create complex images by capturing one wedge-shaped segment and repeating it. I got to thinking, how about recreating that idea in fabrics?

Each pillow requires two fat quarters, and Spoonflower has a bazillion great prints to play with in this way. Go check out the tutorial!

Fall Scarf Tutorial for Spoonflower

OK, so maybe temperatures are in the upper 80's here in PDX this week, but it's still time to get excited about cooler temperatures and scarf-wearing.

I love this Fall scarf I made for Spoonflower. It combines a layer of gauzy voile with a layer of flannel, so it's very lightweight, but still nice and warm. And I hand-quilted around the paisleys, which creates a lovely pattern on the flannel side. Go check out the how-to over on the Spoonflower blog!

Tote Tutorial for Spoonflower
Photoshop wizardry here by Kirby Harris.

I'm thrilled to have another tutorial over at the Spoonflower blog this week! I came up with this one based on how much I love voting in their weekly fabric contests.

Have you ever voted in these things? They're an awesome work distraction. And at the end of voting, you get to see all the fabrics you voted for, and I'm always struck by how nicely they'd all work together in a project.

Tote Tutorial for Spoonflower

...So I came up with this project! You can whip this tote up in just a couple hours, using five test swatches of your favorite Spoonflower fabrics. Go check out the how-to!

spoonflower-placemat-finished-2

I had a complete blast making this tutorial for the Spoonflower blog. They have so many beautiful large-scale prints over there, and I thought it would be fun to play with those in making some giant-size paper piecing.

These fabrics are designed by Holli Zollinger, and you can get more details on them in my tutorial. I had them printed on Spoonflower's Kona Cotton.

Giant Hexie Placemat

...As soon as I finished my photo shoot, K asked, "So, can I eat your snack-model now?"

chenille_flowr_finished_1

It's not like I had the time, really, for another ornament tutorial. But somehow I got all fixated on the idea of chenille stems, and this happened.

Actually, it's a really quick and easy little ornament (not counting glue-dry time). You could use these on your tree, or as garland, or gift tie-ons. You could make a whole mess of them at once, and it's a nice craft for older children, family groups, or holiday craft nights.

Anyway. First you need three 12" chenille stems. Bend them all up according to this handy little video. (Sometimes it's a lot easier to show something in motion than in still photos, you know?)

chenille_flower_04

Once you have three petal units bent, then cut yourself three circles. (I know there are only two pictured here, but bear with me.)

You'll need two circles of fairly stiff cardboard. If you plan to make a two-layer flower, then you'll also need one of regular card stock. My circles here are 1 1/4" in diameter, but that's not like a law or anything.

chenille_flower_05

Get yourself some tacky glue, and put a nice, thick puddle in the center of one of your cardboard circles. Keep it away from the edges, but be pretty generous with it.

chenille_flower_06

Next, place your three petal units into the glue. You'll have plenty of time to arrange them just so while the glue stays wet.

chenille_flower_07

Then, put a little more glue over the center and add the card stock circle. Make sure everything's centered in relation to everything else.

chenille_flower_08

Now, this whole thing needs to go under a heavy stack of books for a while, to press the shape nice and flat. But there's one important key…

chenille_flower_09

…Make sure the weight you place on your flower is balanced. If you're making lots of these ornaments at one time, this won't even be a problem - just spread all the ornaments out under the books.

If you're only making a few at a time, however, you may find that the books can't lay flat over the ornaments - the thickness of the ornaments throws the books off-kilter, like you see above. This will result in off-kilter ornaments!

(Not that this has happened to me or anything.)

chenille_flower_10

…So, just place a little something under all four corners of your books to help them stay nice and parallel to the table top. If you live in a house with thousands of tea bags, like I do, then that's a natural choice. You could also use magazines, or junk mail, or whatever you have on hand.

Leave the books in place for an hour or so while the glue sets.

chenille_flower_11

Then, remove the books and add a second layer of chenille to the top. (How do you get a smaller flower? You just lop off 1/3 to 1/4 of each chenille stem before you bend it into the petal unit.)

chenille_flower_12

Add a little more glue to the center, and then press the other stiff cardboard circle over the top. (Again, make sure things are centered.)

chenille_flower_08

…Then it's back under those books for several hours or overnight.

chenille_flower_13

After that, you can get out all your crafty bits and bobs to decorate the center. I used some scrapbook papers, cut with punches and scissors. I also used some buttons (yay!), ric rac, and sequins. You could also use yarns, felt, pom poms - lots of possibilities!

chenille_flower_03

Lordy, these are fun and addictive to make!

And if you make some, I'd love it if you shared a photo in the CraftyPod Reader Projects Flickr Group!

oshie_ornament_finished_3

I got the inspiration for these ornaments a couple years back, when I saw this post on Zakka Life. I was also inspired by Oshie, an old Japanese craft in which you use small pieces of silk and paper to make padded shapes, which fit together into a particular images. You can see some stunning examples here.

My version is greatly simplified from the traditional craft, but I love the tailored quality these things have! And, due to the whole Kanzashi thing, I have vast stores of tiny fabric scraps. This project is an excellent way to use those up.

oshie_ornament_01

So, wanna make one? Here we go. First, you'll need some thick, fairly rigid cardboard. Thick chipboard or mat board work well here. Corrugated isn't a good choice - it can bend too easily.

I made you guys a downloadable set of four design templates, so feel free to use those or make up your own design. To get started, trace your shape onto the cardboard two times. See the dividing lines on the shape? Transfer these to the cardboard as well.

oshie_ornament_02

Carefully cut them out, making sure you don't bend the cardboard in the process. The easiest way to prevent bending is to always cut in to corners, not around them.

(If you wanted to be fancier than me, you could also cut your shapes out with a craft knife and ruler.)

oshie_ornament_03

Cut one of the two shapes into sections along those dividing lines. Leave the other intact. And then, number the sections identically on each shape, as you see here. This will help you keep everything in the right order later on.

That may seem like a silly idea with this tree shape - after all, it's pretty clear which part is which. But with a shape where all the pieces are nearly identical, this numbering scheme makes a huge difference.)

oshie_ornament_04

OK, now to "upholster" each of these pieces. Start with the cut-apart sections. Trace one onto a sheet of craft foam. (You can get this stuff in the kids' section of most craft stores. One sheet will make a lot of ornaments.)

oshie_ornament_05

It's important that the craft foam be exactly the same size as the cardboard. So stack the two together, and if your foam sticks out at the edges anywhere, like it's doing here, trim away the excess.

oshie_ornament_06

Now it's time for fabric. Cut a piece that's about 1/2" larger on all sides than the cardboard/foam pieces. You don't have to be super-precise about it, as long as there's roughly 1/2" on all sides.

oshie_ornament_07

You'll need some masking tape for the next step. (Good old masking tape!) Cut yourself a whole bunch of little pieces, and spread them out where you can grab them easily. I usually take about a 3" strip off my roll, cut it in half lengthwise, and then snip each half into a bunch of smaller tabs. You'll need some larger and some smaller, like you see here.

Also, place your fabric piece face down. Center the craft foam over that, and center the cardboard over the craft foam.

oshie_ornament_08

Begin the "upholstery" process at the corners. Gently stretch the fabric over one corner of the cardboard - be careful not to pull the fabric so tight that you bend the cardboard. Tape the fabric to the cardboard with the masking tape, burnishing it down firmly with your fingers.

I like to pull all the corners to the back first and tape them down. That gives you nice, smooth fabric coverage.

oshie_ornament_09

With the corners down, then pull the fabric around the sides of the shape and tape it down wherever needed. Some shapes need a lot of tape, and some don't. Just make sure that you're getting the fabric pulled nice and smooth over the front of the shape.

oshie_ornament_11

When you're done, you should have something that looks like this. Be careful not to let the tape wrap up over the sides of the shape - you'll want all the tape hidden.

oshie_ornament_12

Just a quick note: some shapes will have sharper corners, like this one. Occasionally, you may need to trim away a little excess fabric in order to tape it down smoothly. And, if you're taping in tight spaces like this, keep plenty of smaller tabs of tape on hand.

oshie_ornament_13

Repeat this process to "upholster" the remaining pieces. (I have no idea why I feel so compelled to put that word in quotation marks.) As you work, keep these pieces laid out in their numeric order, so you know which ones go where.

Next, cut another piece of fabric that's 1/2" larger than the intact piece on all sides, as you see here. You'll follow the same process to stretch and tape this fabric around the cardboard. Wherever you have an inward-facing corner, like you see at the tree trunk above, clip into the fabric a little.

(Just to clarify a point: this backing piece doesn't have any foam padding. You're just covering the cardboard with fabric.)

oshie_ornament_14

With your fronts and back all covered, it's time to assemble the ornament. Place the back piece with its fabric side down. Then, put some tacky glue on the back of each "upholstered" piece, and then place it on its correct section of the back piece.

oshie_ornament_16

When you glue the topmost piece down, slip in a little folded piece of 1/4" wide ribbon. That acts as a hanger. (Or, if you have no ribbon, use some yarn or a bent piece of wire.)

oshie_ornament_15

When you have the whole thing assembled, it's time to put it under a stack of heavy books to dry. (The pressure will make all the pieces lie nice and flat.) If you have a little glue oozing out at the sides, like you see here. wipe it away with your fingers before you put any books over it.

oshie_ornament_17

Leave your ornament under those books for a few hours or overnight. And you're done!

There are so many cool ways to interpret this project. I love using fabrics with metallic accents, because they look a lot like Japanese washi paper.

oshie_ornament_finished_1

Here's one where I "fussy-cut" my fabric to take better advantage of the leaf design.

oshie_ornament_finished_2

…And here's one covered with some beautiful dyed silk Pat sent me. It has such a pretty luster to it.

(Incidentally, the wreath is probably the most challenging shape of the four I designed, due to all the curved edges. I'd recommend making one of the other shapes first. Also, if you make a wreath, I recommend not cutting two identical cardboard shapes at first. Instead, cut one out, cut it into sections and "upholster" it, and then re-assemble them. Trace around this re-assembled wreath to get your backing piece.)

oshie_ornament_finished_4

If you make one of these, I'd love to see! Will you post a photo to the CraftyPod Reader Projects Flickr Group?

little_pc_house_22

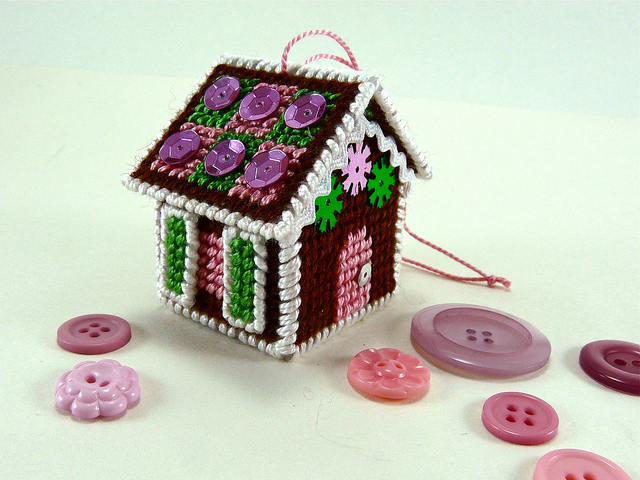
Yup, I'm pretty excited about this tutorial. Because I want you all to experience the wonder that is plastic canvas, I figured out a very simple way to make this tiny gingerbread house. It's about 2" square, and just as cute as it can be.

If you're new to plastic canvas (heh heh), you might take a gander at this past tutorial and this one to glean some basics on handling your canvas and yarn.

needlepoint_box18

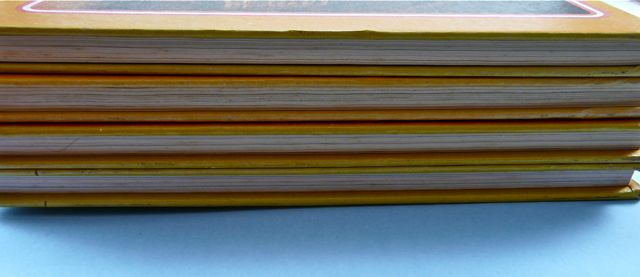
So, if you've been reading this blog for any length of time, you've likely seen this photo. For this project, I'm using 10-count plastic canvas – the stuff in the middle. You can also use 7-count, but your house will end up larger.

(If you can't find the 10-count in your local craft store, you can also get it online.)

little_pc_house_01

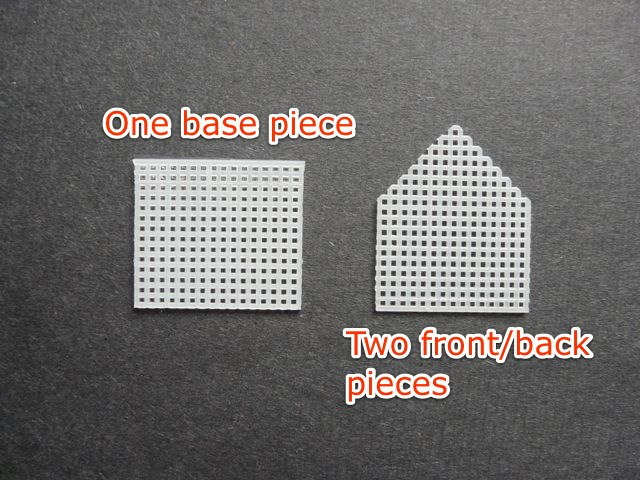
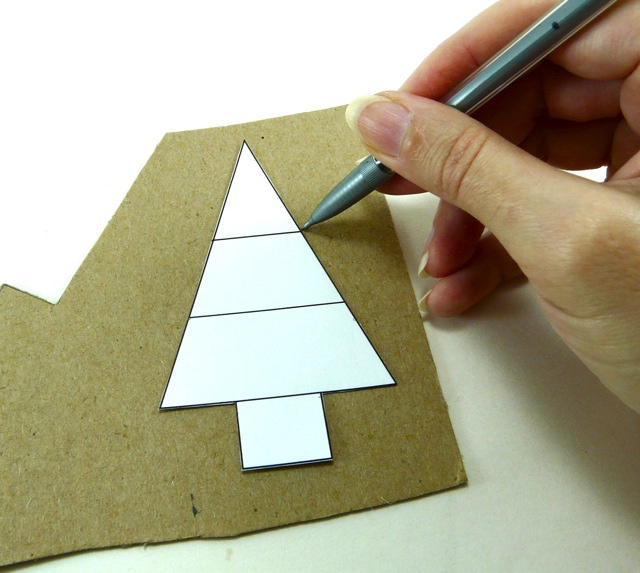
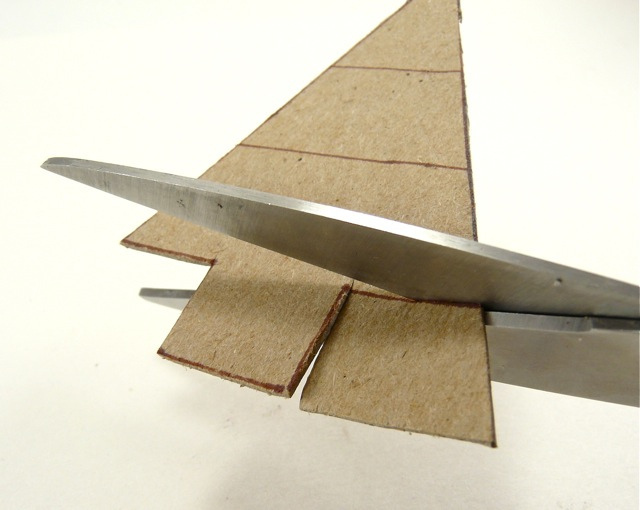
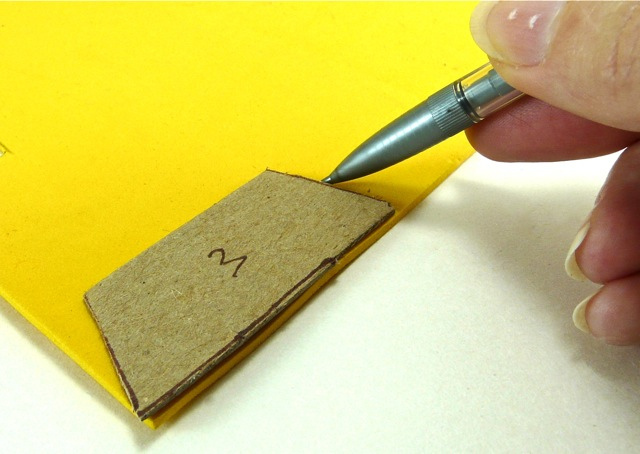
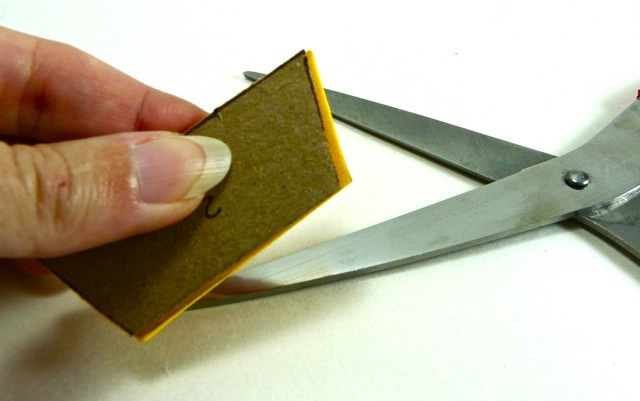
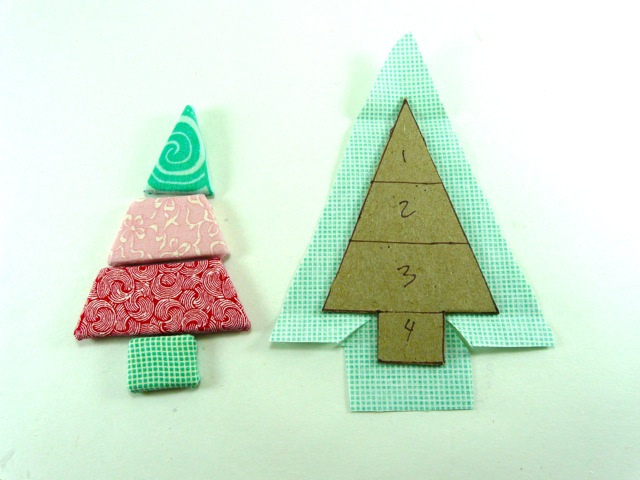
I don't want you to get too hung up on making a formal pattern here. I'll show you the pieces you need to cut, and you can decide on the final size. I usually cut my front/back piece first, and then use it as a measuring guide for the rest of my pieces.

You can draw cutting lines on your canvas with a fine-point Sharpie, or just cut freehand. One sheet of canvas will make a handful of these ornaments.

The only crucial bit is that your front/back piece needs to be an odd number of squares wide. That's so you can form a peak at the center, like you see here.

little_pc_house_02

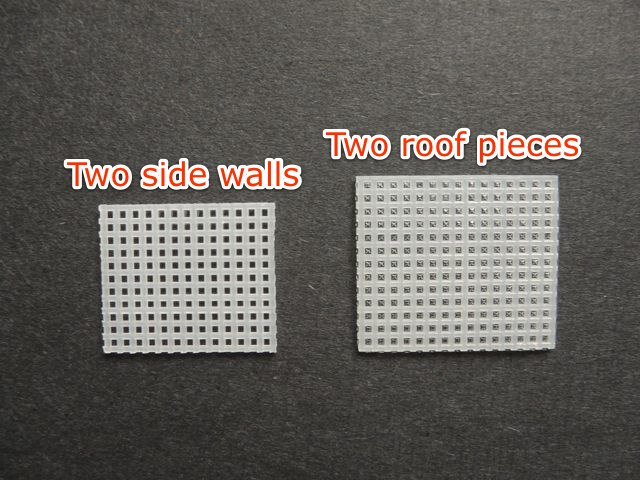
My side pieces are the same height as the front/back walls (minus the peaked roof part), and as long as I want my house to be.

For the roof, I take the length of the side wall and add two squares, so my roof hangs over a bit.

little_pc_house_03

Once you have all seven pieces cut, then it's time to stitch 'em! I'm using good old Continental Stitch here, and two strands of pearl cotton embroidery floss. For this size canvas, I like a crewel embroidery needle, even though it's sharp and needlepoint needles are usually dull. This size fits through the canvas holes nicely.

I'm pretty informal about it, though – I don't work in rows. I just fill in the most important details first, and then fill in around them.

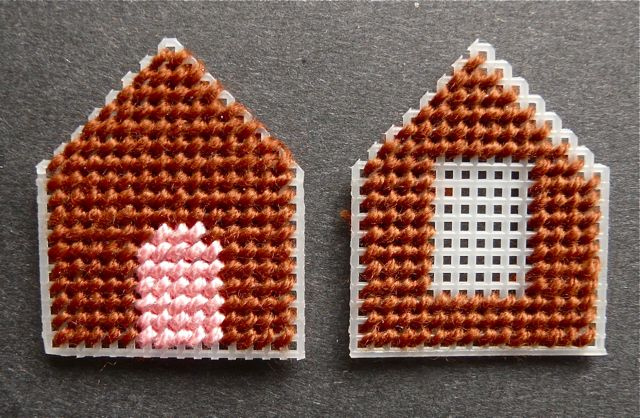
So, for the house front, I first stitched in the door where I wanted it, and then filled in the brown. (If your door is an odd number of stitches wide, you can give it a curved top like this.)

little_pc_house_05

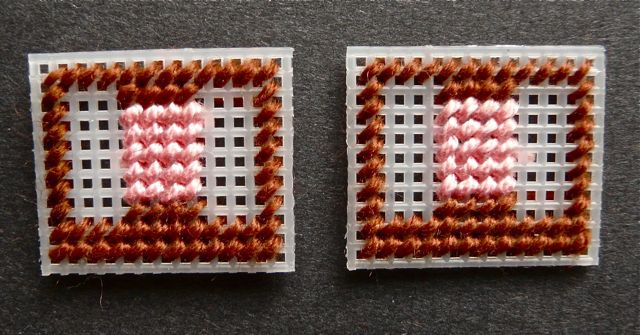
Now, on the side walls (and the back), I left some areas un-stitched. These spots are where I'll put some tiny shutters in a moment.

(Again, I stitched this informally, filling in the outline first, then figuing out where I wanted those pink windows to be, and then filling in around the shutter spaces. Longtime needlepointers may find this method rather gauche, but it works for me.)

little_pc_house_08

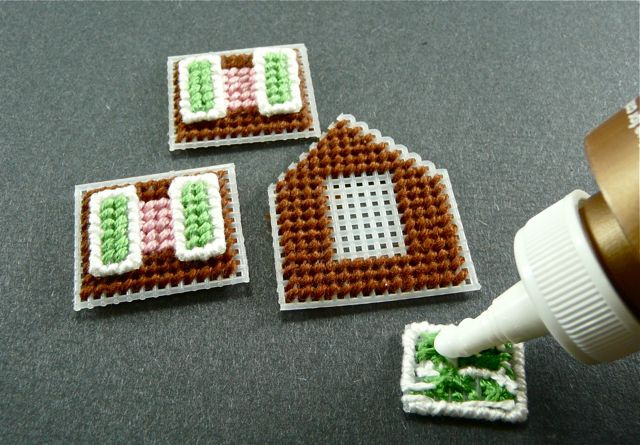
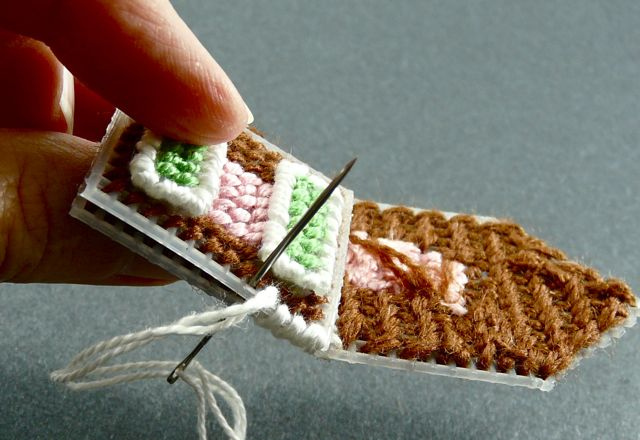
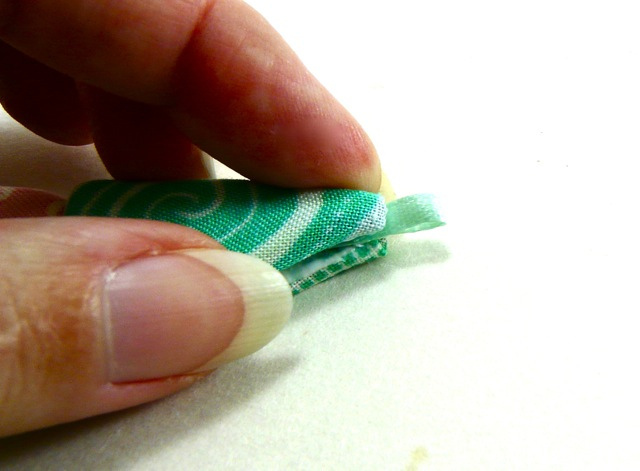
Here are my little shutters, which are just three squares wide. I stitched their centers, and then covered all the edges with overcast stitch.

You can glue them right to the base pieces with tacky glue, being careful not to let excess glue ooze through and stick your project to the table. (Not that this has happened to me or anything.) Give the glue an hour or so to dry before you proceed with the rest of the project.

little_pc_house_07

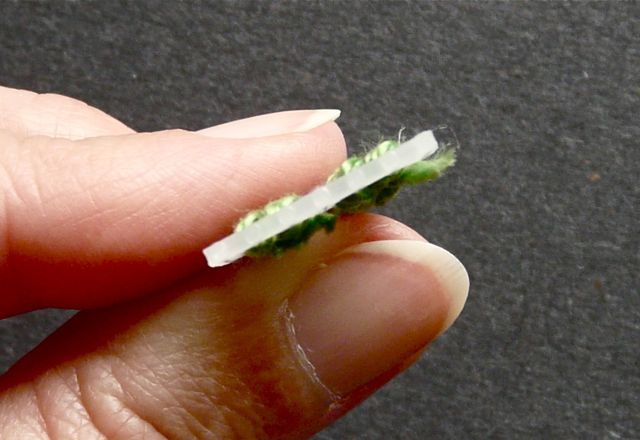
So why am I leaving un-stitched areas to glue these things to? Well, plastic canvas, once stitched, is pretty thick. By leaving the space under the shutters unstitched, I'm creating a little recessed area. That makes the whole thing nice and flat when it's glued together.

little_pc_house_04

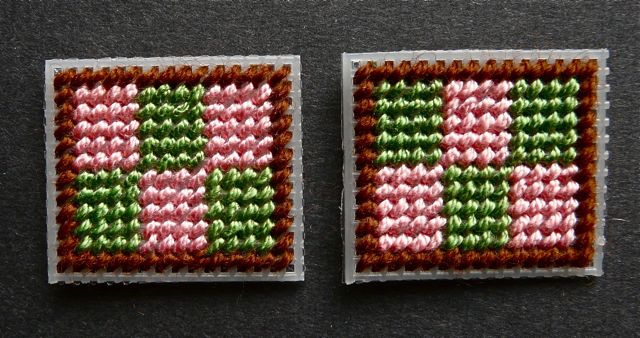
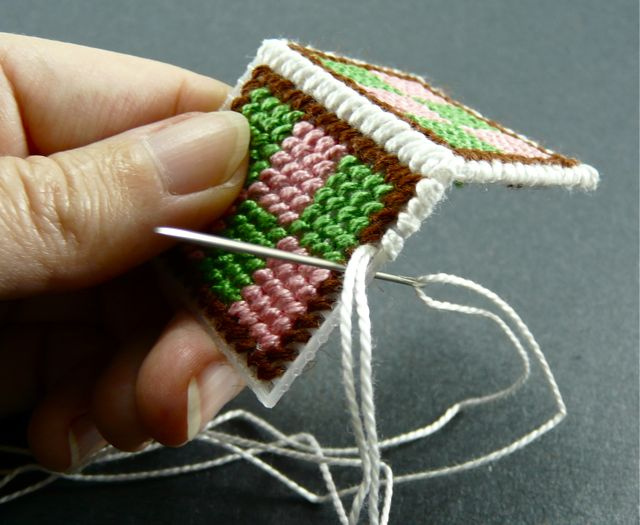
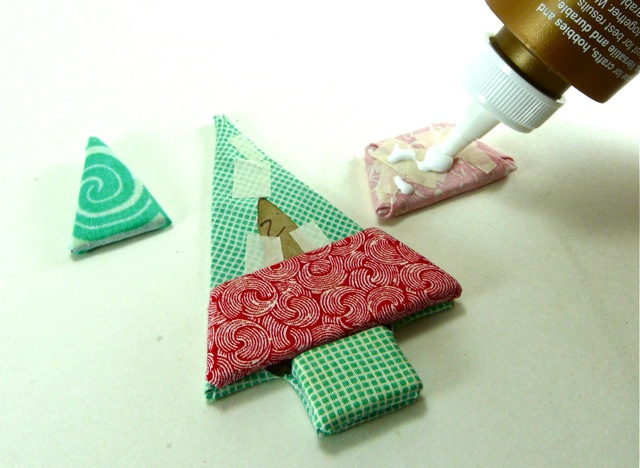
You can stitch up your roof pieces in any design you like. Set these aside for the moment, because we're going to assemble our little house first.

little_pc_house_12

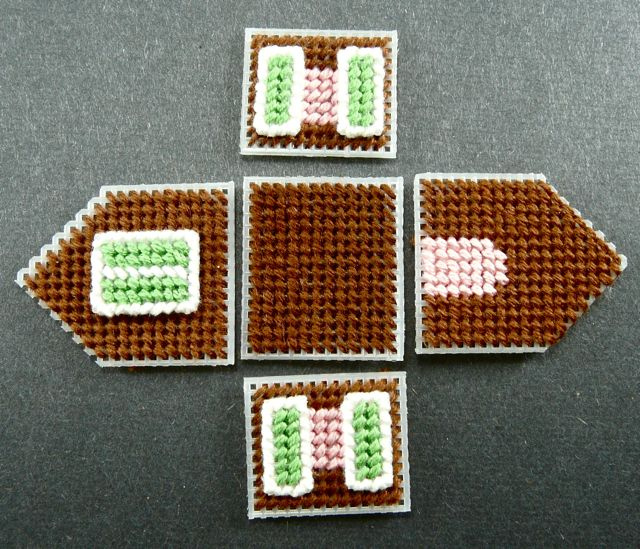
Here are all the pieces we'll be assembling first. Lay them out in this configuration, with the base in the center.

little_pc_house_13

We'll be joining these pieces with a whip stitch. First, you'll sew the bottom edge of each front, back, and side piece to the base piece.

If you have a long enough strand of floss, you can do all four seams as one continuous seam that travels around the square. (Does that make sense? The next photo might help.)

little_pc_house_14

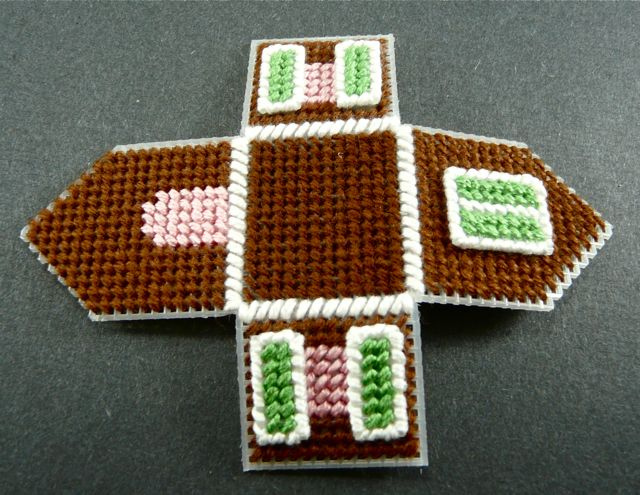
Here's what that looks like when you're done.

little_pc_house_15

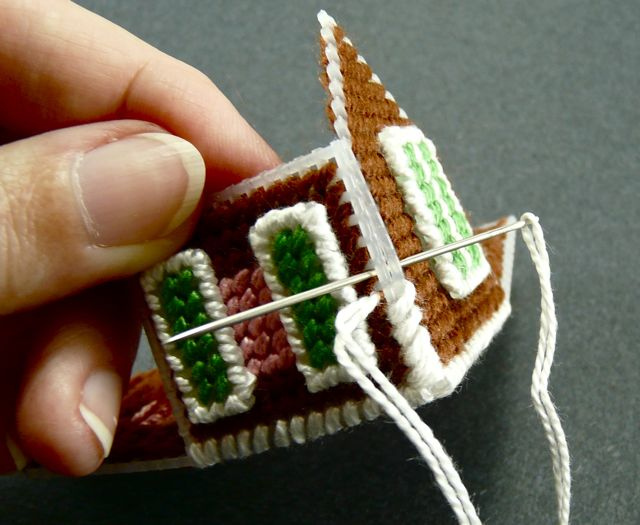
Then, you just fold up the walls and whip stitch at the four corners. Here's where things can get a little fiddly in places….

little_pc_house_16

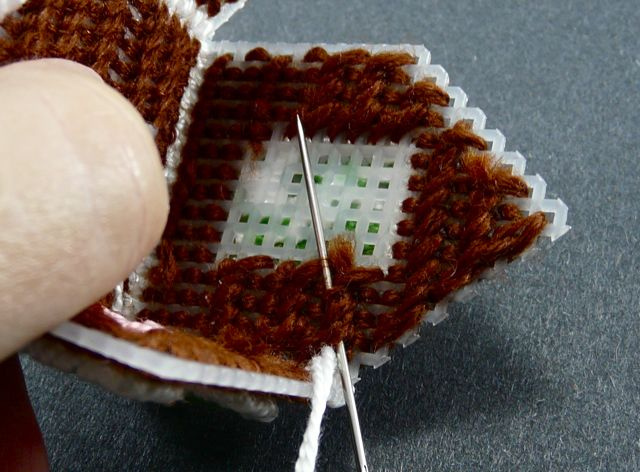
To end a seam, you'll pass your needle under the back of some nearby stitches and then cut the floss. Sometimes, manouvering through these stitches will be challenging. Two important tricks to remember:

  • You can always pass your needle right out through the wall of the house if you need to.
  • Needle-nose pliers really help push or pull the needle through tight spaces.

little_pc_house_10

Anyway. Now we'll add the roof, which is way easier. Just whip stitch the two pieces together in the center and then finish the edges with overcast stitch.

little_pc_house_17

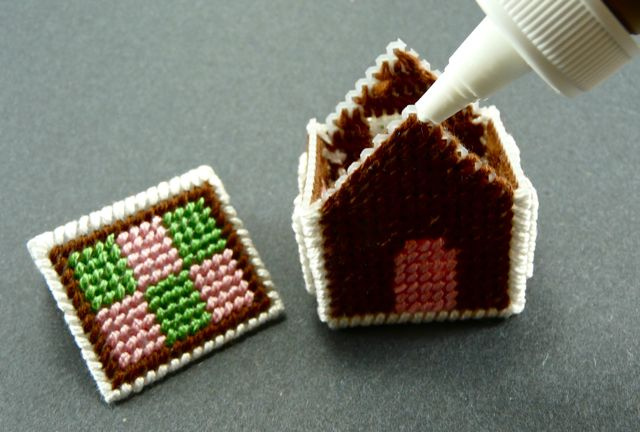
Now, bust out your tacky glue again and put a fairly generous bead along the entire roof line.

little_pc_house_18

Then, press the roof in place. If any excess glue oozes out, don't worry too much - we'll cover up this join in a minute.

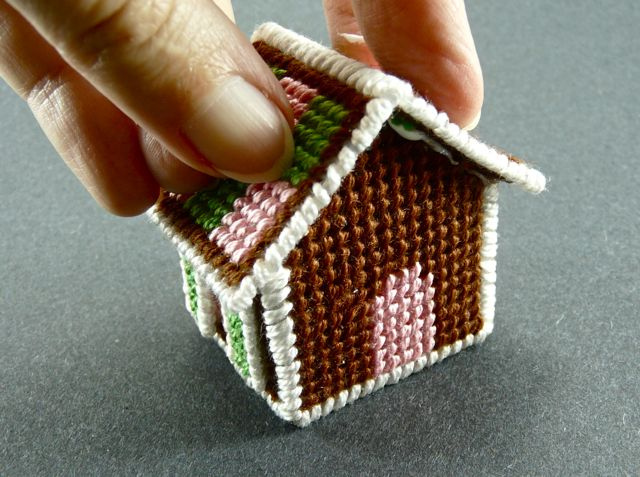
Press the roof down for a minute or so while the glue sets, and then leave it to dry for an hour or so.

little_pc_house_19

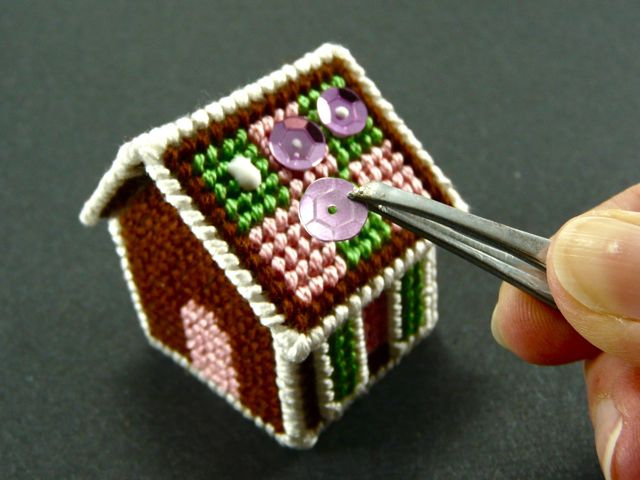
You can, of course, needlepoint all the decorations into your house, but I thought it would be much simpler to glue them on. So I dug into my Bag of Assorted Sparklies. (Tweezers make tiny sequin-handling so much easier.)

little_pc_house_20

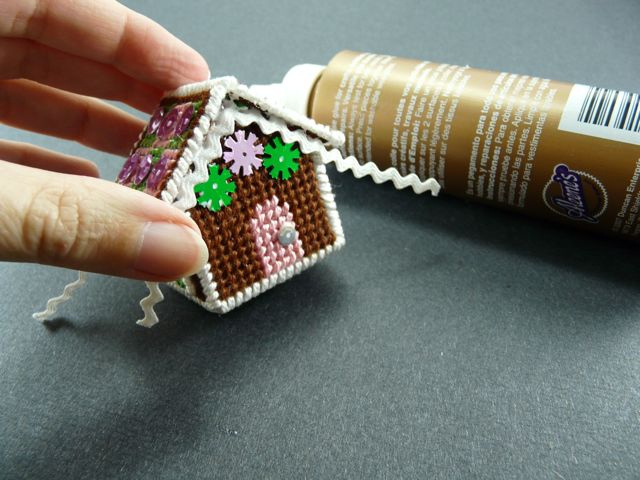
Then I grabbed out some tiny ric rac and glued a strand over the point where I glued on the roof. You only need to do this at the front and back - the sides won't show at all.

I just cut the strand a little too long, as you see here, and then glued it in place. When the glue dried, I cut away the excess.

little_pc_house_21

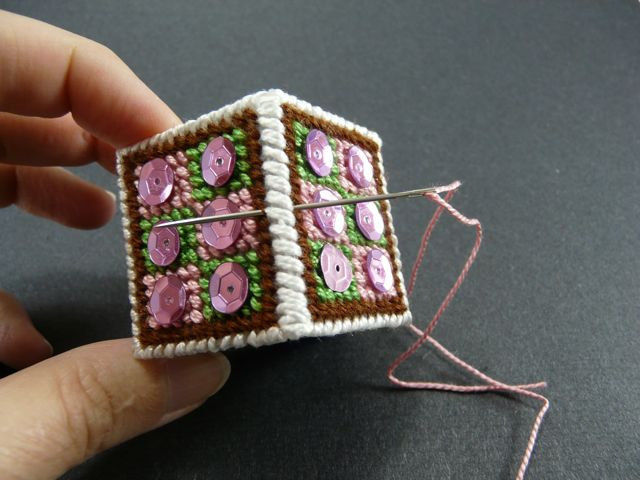
And if you want to add a hanger, just take a stitch through the peak of the roof at the center, and knot the floss in a loop.

If you make one of these, I'd love to see! Will you add it to the CraftyPod Reader Projects Flickr Group?

Pages